Creating Online Digital Publications with Scalar
5 Steps to Create Relationships Between Audio and Images Using Scalar’s Annotation Feature
Sarah York-Bertram
Introduction
In this step-by-step tutorial, you will learn how to make audio clips and develop relationships between the clips and digital photos using the Alliance for Networking Visual Culture’s Scalar platform. This topic is especially pertinent to those of you:
-
for whom “voice” is essential to your scholarship,
-
those of you who have under-utilized digital media,
-
and / or those of you who are interested in learning what resources exist for creating and mobilizing digital scholarship.
The Ododo Wa: Stories of Girls in War exhibit has been designed to be an advocacy tool that mobilizes storytelling for policy change. The design of the Ododo Wa Community Dialogues Scalar project aims to extend the utility of the exhibit as a tool for advocacy, by bringing the exhibit and its associated dialogues online. While debriefing with exhibit designers about the exhibit’s launch and reviewing the photos and transcripts, I made note of moments that demonstrated the exhibit’s utility for Acan’s and Amony’s storytelling. After receiving the pertinent permissions, I set to work creating audio clips that would pair with the photos.
5 Steps to creating relationships between images and audio using Scalar’s Annotation Feature:
Step 1: Evaluate Media & Text
Step 2: Make audio clip
Step 3: Importing Media into Scalar
Step 4: Annotating
Step 5: Save and View
Step 1: Evaluate Media & Text
Start by familiarizing yourself with the audio and related media files. While listening to the audio file, note the sound quality. Consider relationships between the audio and other media. Were there photographers or videographers capturing what was going on at the time of the recording? Those who were present during the making of the file may be able to shed light on its context and answer your questions about the media’s significance.
Permissions: If you are working with various partners and organizations for your project, it is important to familiarize yourself with best practices and ethics protocols in relation to digital humanities scholarship and the other intersections of your Scalar project. Scalar is Open Source so copyright and credit may be an important area of focus for your project.
Your evaluation and selection of media will depend on the needs of your project. See the Creating your own Scalar Project section in the pressbook for guiding questions and tips.
Transcripts: At CSiW, the team transcribed audio and video recordings from the Ododo Wa exhibit events. This has been an essential part of the process developing the Ododo Wa Community Dialogues Scalar project as it has enabled us to do textual analysis as well as practice deep listening while transcribing audio. We have also benefited from partners sharing transcripts with us. Also, if you have a transcript that includes time stamps, making an audio clip can be an easier process.
Step 2: Make audio clip
Use the audio editor of your choice. Import the audio file and make a copy. The instructions in this tutorial are for Audacity, a free, open source, easy-to-use, multi-track audio editor and recorder. Audacity automatically prompts users to make a copy of their original file while importing it.
-
Locate the section of the audio file that you would like to feature in the project. Users can scroll to the right time and make use of the “Zoom Tool” (magnifying glass) for easy editing.

-
Once you have listened and confirmed the parameters of the clip, use the “selection tool” (cursor) and select the beginning and end of your clip.

-
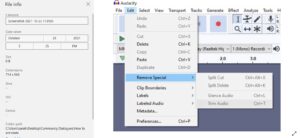
On the “Edit” tab select “Remove Special.” Then click “Trim Audio.” This removes all of the audio file except what you have selected.

You can continue to edit the audio clip if you would like. Use the “Zoom Tool” to take a close look at the clip. Make edits that serve the project.
-
Use the selection tool to select the piece of audio you would like to remove for your clip. Use “Backspace” or “Delete” on your keyboard to remove
-
Listen to your audio clip. If it’s ready, click the file tab and select export. If you plan to preserve the clip, save your clip as a WAV file and export it again to make an MP3 as well. During the exporting process, Audacity will allow you to input data about the audio file you have created.
Step 3: Importing Media into Scalar
Now that you have made the audio clip, you can review your media files for sizing. Scalar supports media files up to 2MBs. If you are using Windows, you can check the size of the digital photo by clicking the ellipses (…) on the top right side. Select “File Information.” The file size should be visible in the column that opens on the left side.
If necessary, you can compress your photo by clicking the ellipses (…) again on the top right corner of the Windows photo viewer and select resize. Choose 2MP and click save.
Note: There is not an exact 1:1 ratio for MBs and MPs so you may need to continue to edit the sizing of your files.
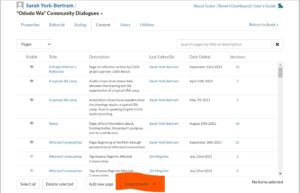
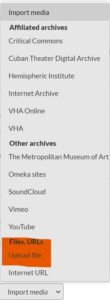
When the files are the right size, upload them onto Scalar. First, log onto Scalar. On the Dashboard, select Content.
Then click the dropdown Import Media tab and select Upload file.
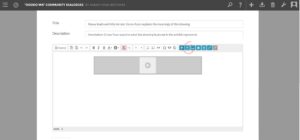
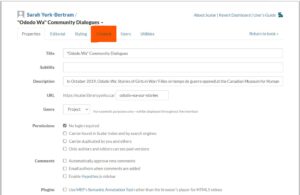
Scalar will take you to its Upload Media File page and prompt you to create a title, a description, to select where the media file will Upload to, how Scalar will Create a filename for the Media page URL, if you would like the file to replace one that is already existing, the Metadata fields, and the Choose file tab.
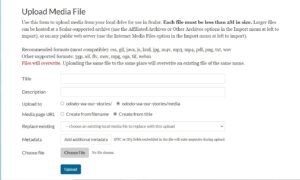
Once you have added the pertinent information and chosen your file, click Upload. Do this for both your image and your audio.
Note: Sometimes it takes a while for the media to upload. Be patient.
Step 4: Annotating
Annotations on Scalar offer ways of developing, expanding, and curating media on your Scalar project. Scalar allows users to annotate a range of media, including audio, video, images, and plain text, and annotations can be used in a variety of ways. Annotated media on Scalar can be hidden or made visible, allowing you to use the same media with or without the annotations.
To annotate media in Scalar, select the paperclip Annotation icon when you are on the media’s Page. It will take you to the Annotation Editor.

Click the + button to add an annotation and select its location on the image. Add a title and click “Done.”
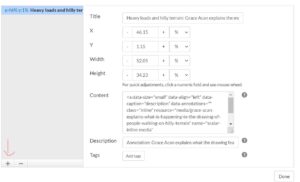
At this stage, the annotation does not have a relationship with its audio media content. To place the audio media file in the annotation, click the Annotation title on the image. It will take you to the Annotation’s page.

Click the Pencil icon, which is the Edit button.
Select the Inline Scalar Media Link. The audio you uploaded will be among the media content you can select.
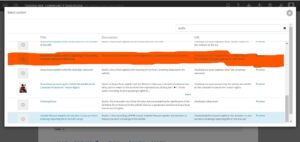
Once you’ve added your Inline Media onto the Annotation Page, it should look like this: