<?xml version="1.0" encoding="UTF-8"?>
<!DOCTYPE html PUBLIC "-//W3C//DTD XHTML 1.1//EN" "http://www.w3.org/TR/xhtml11/DTD/xhtml11.dtd">
<html xmlns="http://www.w3.org/1999/xhtml" xml:lang="en">
<head>
<meta content="text/html; charset=UTF-8" http-equiv="content-type" />
<meta http-equiv="Content-Language" content="en" />
<meta name="generator" content="Pressbooks 6.22.1" />
<meta name="pb-authors" content="Tomasz Mrozewski" />
<meta name="pb-title" content="OJS for YDJ" />
<meta name="pb-language" content="en-ca" />
<meta name="pb-cover-image" content="https://pressbooks.library.yorku.ca/ojs3point2/wp-content/uploads/sites/90/2021/07/OJS-for-YDJ-cover.png" />
<meta name="pb-publisher" content="York Digital Journals, York University Libraries" />
<meta name="pb-publisher-city" content="Toronto" />
<meta name="pb-book-license" content="cc-by" />
<meta name="pb-short-title" content="A procedural guide" />
<meta name="pb-copyright-holder" content="Tomasz Mrozewski" />
<meta name="pb-about-140" content="A guide to workflows in OJS" />
<meta name="pb-about-50" content="This guide walks you through specific workflows in OJS. It is based on commonly asked questions from YDJ editors. This is a living document: I will add content as I develop it and update it as required." />
<meta name="pb-primary-subject" content="KNTP1" />
<title>OJS for YDJ</title>
</head>
<body lang='en' >
<div id="half-title-page"><h1 class="title">OJS for YDJ</h1></div>
<div id="title-page">
			<h1 class="title">OJS for YDJ</h1>
		<h2 class="subtitle"></h2>
					<p class="author">Tomasz Mrozewski</p>
								<p class="publisher">York Digital Journals, York University Libraries</p>
		<p class="publisher-city">Toronto</p>
	</div>
<div id="copyright-page">
	<div class="ugc">
					
<div class="license-attribution"><p><img src="https://pressbooks.library.yorku.ca/ojsforydj/wp-content/themes/pressbooks-book/packages/buckram/assets/images/cc-by.svg" alt="Icon for the Creative Commons Attribution 4.0 International License" /></p><p>OJS for YDJ Copyright © by <span>Tomasz Mrozewski</span> is licensed under a <a rel="license" href="https://creativecommons.org/licenses/by/4.0/">Creative Commons Attribution 4.0 International License</a>, except where otherwise noted.</p></div>

									</div>
</div>
<div id="toc">
	<h1>Contents</h1>
	<ul>
					<li class="front-matter introduction">
	<a href="#front-matter-introduction-2">
		<span class="toc-chapter-title">Introduction</span>
							</a>
	</li>

					<li class="part">
	<a href="#part-the-ojs-site">
					The OJS site
			</a>
</li>

					<li class="chapter standard">
	<a href="#chapter-understanding-the-ojs-homepage-layout-default-theme">
		<span class="toc-chapter-title">Understanding the OJS homepage layout (Default Theme)</span>
							</a>
	</li>

					<li class="chapter standard">
	<a href="#chapter-managing-appearance">
		<span class="toc-chapter-title">Managing your site's appearance</span>
							</a>
	</li>

					<li class="chapter standard">
	<a href="#chapter-adding-custom-blocks-right-sidebar">
		<span class="toc-chapter-title">Adding custom blocks (right sidebar)</span>
							</a>
	</li>

					<li class="chapter standard">
	<a href="#chapter-managing-plugins">
		<span class="toc-chapter-title">Managing plugins</span>
							</a>
	</li>

					<li class="chapter standard">
	<a href="#chapter-web-and-readership-statistics">
		<span class="toc-chapter-title">Web and readership statistics</span>
							</a>
	</li>

					<li class="chapter standard">
	<a href="#chapter-changing-user-roles">
		<span class="toc-chapter-title">Changing user roles</span>
							</a>
	</li>

					<li class="chapter standard">
	<a href="#chapter-reviewing-user-roles">
		<span class="toc-chapter-title">Reviewing user roles</span>
							</a>
	</li>

					<li class="chapter standard">
	<a href="#chapter-configuring-subscription-settings">
		<span class="toc-chapter-title">Configuring subscription settings</span>
							</a>
	</li>

					<li class="chapter standard">
	<a href="#chapter-adding-sections">
		<span class="toc-chapter-title">Adding sections</span>
							</a>
	</li>

					<li class="chapter standard">
	<a href="#chapter-enabling-and-disabling-notifications">
		<span class="toc-chapter-title">Enabling and disabling notifications</span>
							</a>
	</li>

					<li class="part">
	<a href="#part-submissions">
					Submissions
			</a>
</li>

					<li class="chapter standard">
	<a href="#chapter-using-the-quicksubmit-plugin">
		<span class="toc-chapter-title">Using the QuickSubmit Plugin</span>
							</a>
	</li>

					<li class="chapter standard">
	<a href="#chapter-adding-replacing-galleys">
		<span class="toc-chapter-title">Adding and replacing galleys</span>
							</a>
	</li>

					<li class="chapter standard">
	<a href="#chapter-changing-the-section-of-a-submission">
		<span class="toc-chapter-title">Changing the section of a submission</span>
							</a>
	</li>

					<li class="chapter standard">
	<a href="#chapter-editing-after-publication">
		<span class="toc-chapter-title">Editing a submission after publication</span>
							</a>
	</li>

					<li class="chapter standard">
	<a href="#chapter-adding-data-sets-to-articles">
		<span class="toc-chapter-title">Adding data sets to articles</span>
							</a>
	</li>

					<li class="chapter standard">
	<a href="#chapter-adding-dois-to-article-galleys-before-publication">
		<span class="toc-chapter-title">Adding DOIs to submission galleys before publication</span>
							</a>
	</li>

					<li class="chapter standard">
	<a href="#chapter-category">
		<span class="toc-chapter-title">Understanding and using Categories</span>
							</a>
	</li>

					<li class="part">
	<a href="#part-issues">
					Issues
			</a>
</li>

					<li class="chapter standard">
	<a href="#chapter-creating-an-issue">
		<span class="toc-chapter-title">Creating an issue</span>
							</a>
	</li>

					<li class="chapter standard">
	<a href="#chapter-publishing-an-issue">
		<span class="toc-chapter-title">Publishing an issue</span>
							</a>
	</li>

					<li class="chapter standard">
	<a href="#chapter-reordering-the-issue-table-of-contents">
		<span class="toc-chapter-title">Reordering the issue Table of Contents</span>
							</a>
	</li>

					<li class="chapter standard">
	<a href="#chapter-setting-your-current-issue">
		<span class="toc-chapter-title">Setting your Current Issue</span>
							</a>
	</li>

					<li class="chapter standard">
	<a href="#chapter-changing-the-order-of-issues-in-your-archive">
		<span class="toc-chapter-title">Changing the order of issues in your Archive</span>
							</a>
	</li>

					<li class="chapter standard">
	<a href="#chapter-issue-galley">
		<span class="toc-chapter-title">Adding a full-issue PDF galley</span>
							</a>
	</li>

					<li class="part">
	<a href="#part-dois">
					Digital Object Identifiers (DOI)
			</a>
</li>

					<li class="chapter standard">
	<a href="#chapter-determining-the-structure-of-your-dois">
		<span class="toc-chapter-title">Determining the structure of your DOIs</span>
							</a>
	</li>

					<li class="chapter standard">
	<a href="#chapter-reference-lists">
		<span class="toc-chapter-title">Uploading and publishing reference lists</span>
							</a>
	</li>

					<li class="chapter standard">
	<a href="#chapter-manual-dois">
		<span class="toc-chapter-title">Creating and registering DOIs</span>
							</a>
	</li>

					<li class="chapter standard">
	<a href="#chapter-dois-and-quicksubmit">
		<span class="toc-chapter-title">DOIs and QuickSubmit</span>
							</a>
	</li>

					<li class="part">
	<a href="#part-alternative-publication-models">
					Alternative publication models
			</a>
</li>

					<li class="chapter standard">
	<a href="#chapter-publishing-articles-in-advance-of-full-issue-publication">
		<span class="toc-chapter-title">Publishing submissions in advance of regular issues: &quot;online first&quot; or &quot;Forthcoming&quot;</span>
							</a>
	</li>

					<li class="chapter standard">
	<a href="#chapter-continuous-publication-in-a-regular-issue-rolling-publication">
		<span class="toc-chapter-title">Continuous publication in a regular issue: &quot;rolling publication&quot;</span>
							</a>
	</li>

					<li class="chapter standard">
	<a href="#chapter-adding-dois-rolling-publication">
		<span class="toc-chapter-title">Adding DOIs for online first or rolling publication models</span>
							</a>
	</li>

					<li class="chapter standard">
	<a href="#chapter-bypassing-the-editorial-workflow-in-ojs">
		<span class="toc-chapter-title">Bypassing the editorial workflow in OJS</span>
							</a>
	</li>

					<li class="chapter standard">
	<a href="#chapter-publishing-audio-or-video-journal-content">
		<span class="toc-chapter-title">Publishing audio or video journal content</span>
							</a>
	</li>

					<li class="part">
	<a href="#part-accessibility">
					Accessibility
			</a>
</li>

					<li class="chapter standard">
	<a href="#chapter-adding-title-and-heading-tags-to-a-word-document">
		<span class="toc-chapter-title">Adding title and heading tags to a Word document</span>
							</a>
	</li>

					<li class="part">
	<a href="#part-metrics">
					Metrics
			</a>
</li>

					<li class="chapter standard">
	<a href="#chapter-altmetric-explorer">
		<span class="toc-chapter-title">Altmetric Explorer</span>
							</a>
	</li>

					<li class="chapter standard">
	<a href="#chapter-plum-metrics">
		<span class="toc-chapter-title">Plum metrics</span>
							</a>
	</li>

					<li class="chapter standard">
	<a href="#chapter-crossref-cited-by">
		<span class="toc-chapter-title">Crossref Cited-by</span>
							</a>
	</li>

					<li class="part">
	<a href="#part-slug-69e2a724249d4">
					ORCID iD
			</a>
</li>

					<li class="part">
	<a href="#part-article-layout-and-design">
					Article layout and design
			</a>
</li>

					<li class="chapter standard">
	<a href="#chapter-creating-article-templates-in-word">
		<span class="toc-chapter-title">Creating article templates in Word</span>
							</a>
	</li>

					<li class="back-matter glossary">
	<a href="#back-matter-slug-141">
		<span class="toc-chapter-title">Glossary</span>
							</a>
	</li>

			</ul>
</div>
<div class="front-matter introduction " id="front-matter-introduction-2" title="Introduction">
	<div class="front-matter-title-wrap">
		<p class="front-matter-number">1</p>
		<h1 class="front-matter-title">Introduction</h1>
								</div>
	<div class="ugc front-matter-ugc">
				 <div class="textbox shaded"><strong>Last updated:</strong> September 29, 2021</div> <p>This book is designed to familiarize <span class="glossary-term">YDJ</span> journal editors with <span class="glossary-term">OJS</span> and to walk you through key workflows. Unless otherwise noted, this guide refers to OJS 3.</p> <p>This guide has been created by York University Libraries’ Digital Publishing Librarian Tomasz Mrozewski. Any errors are the author’s own. You should also see <a href="https://docs.pkp.sfu.ca/" data-url="https://docs.pkp.sfu.ca/">PKP’s guide to OJS</a> to learn more about what the fields and options mean on particular screens.</p> 
	</div>


	</div>
<div class="part-wrapper" id="part-the-ojs-site-wrapper">
    <div class="part  " id="part-the-ojs-site">
	<div class="part-title-wrap">
		<p class="part-number">I</p>
		<h1 class="part-title">The OJS site</h1>
	</div>
	<div class="ugc part-ugc">
		<div class="textbox shaded"><strong>Last updated:</strong> October 4, 2021</div> <p>This sections deals with parts of the OJS site that don’t relate directly to issues or submissions. This includes page content and user roles. See also <a href="https://docs.pkp.sfu.ca/" data-url="https://docs.pkp.sfu.ca/">PKP Docs</a> for the developer’s documentation on how to work with OJS.</p>
	</div>
			
				
	</div>
<div class="chapter standard with-subsections" id="chapter-understanding-the-ojs-homepage-layout-default-theme" title="Understanding the OJS homepage layout (Default Theme)">
	<div class="chapter-title-wrap">
		<p class="chapter-number">1</p>
		<h1 class="chapter-title">Understanding the OJS homepage layout (Default Theme)</h1>
								</div>
	<div class="ugc chapter-ugc">
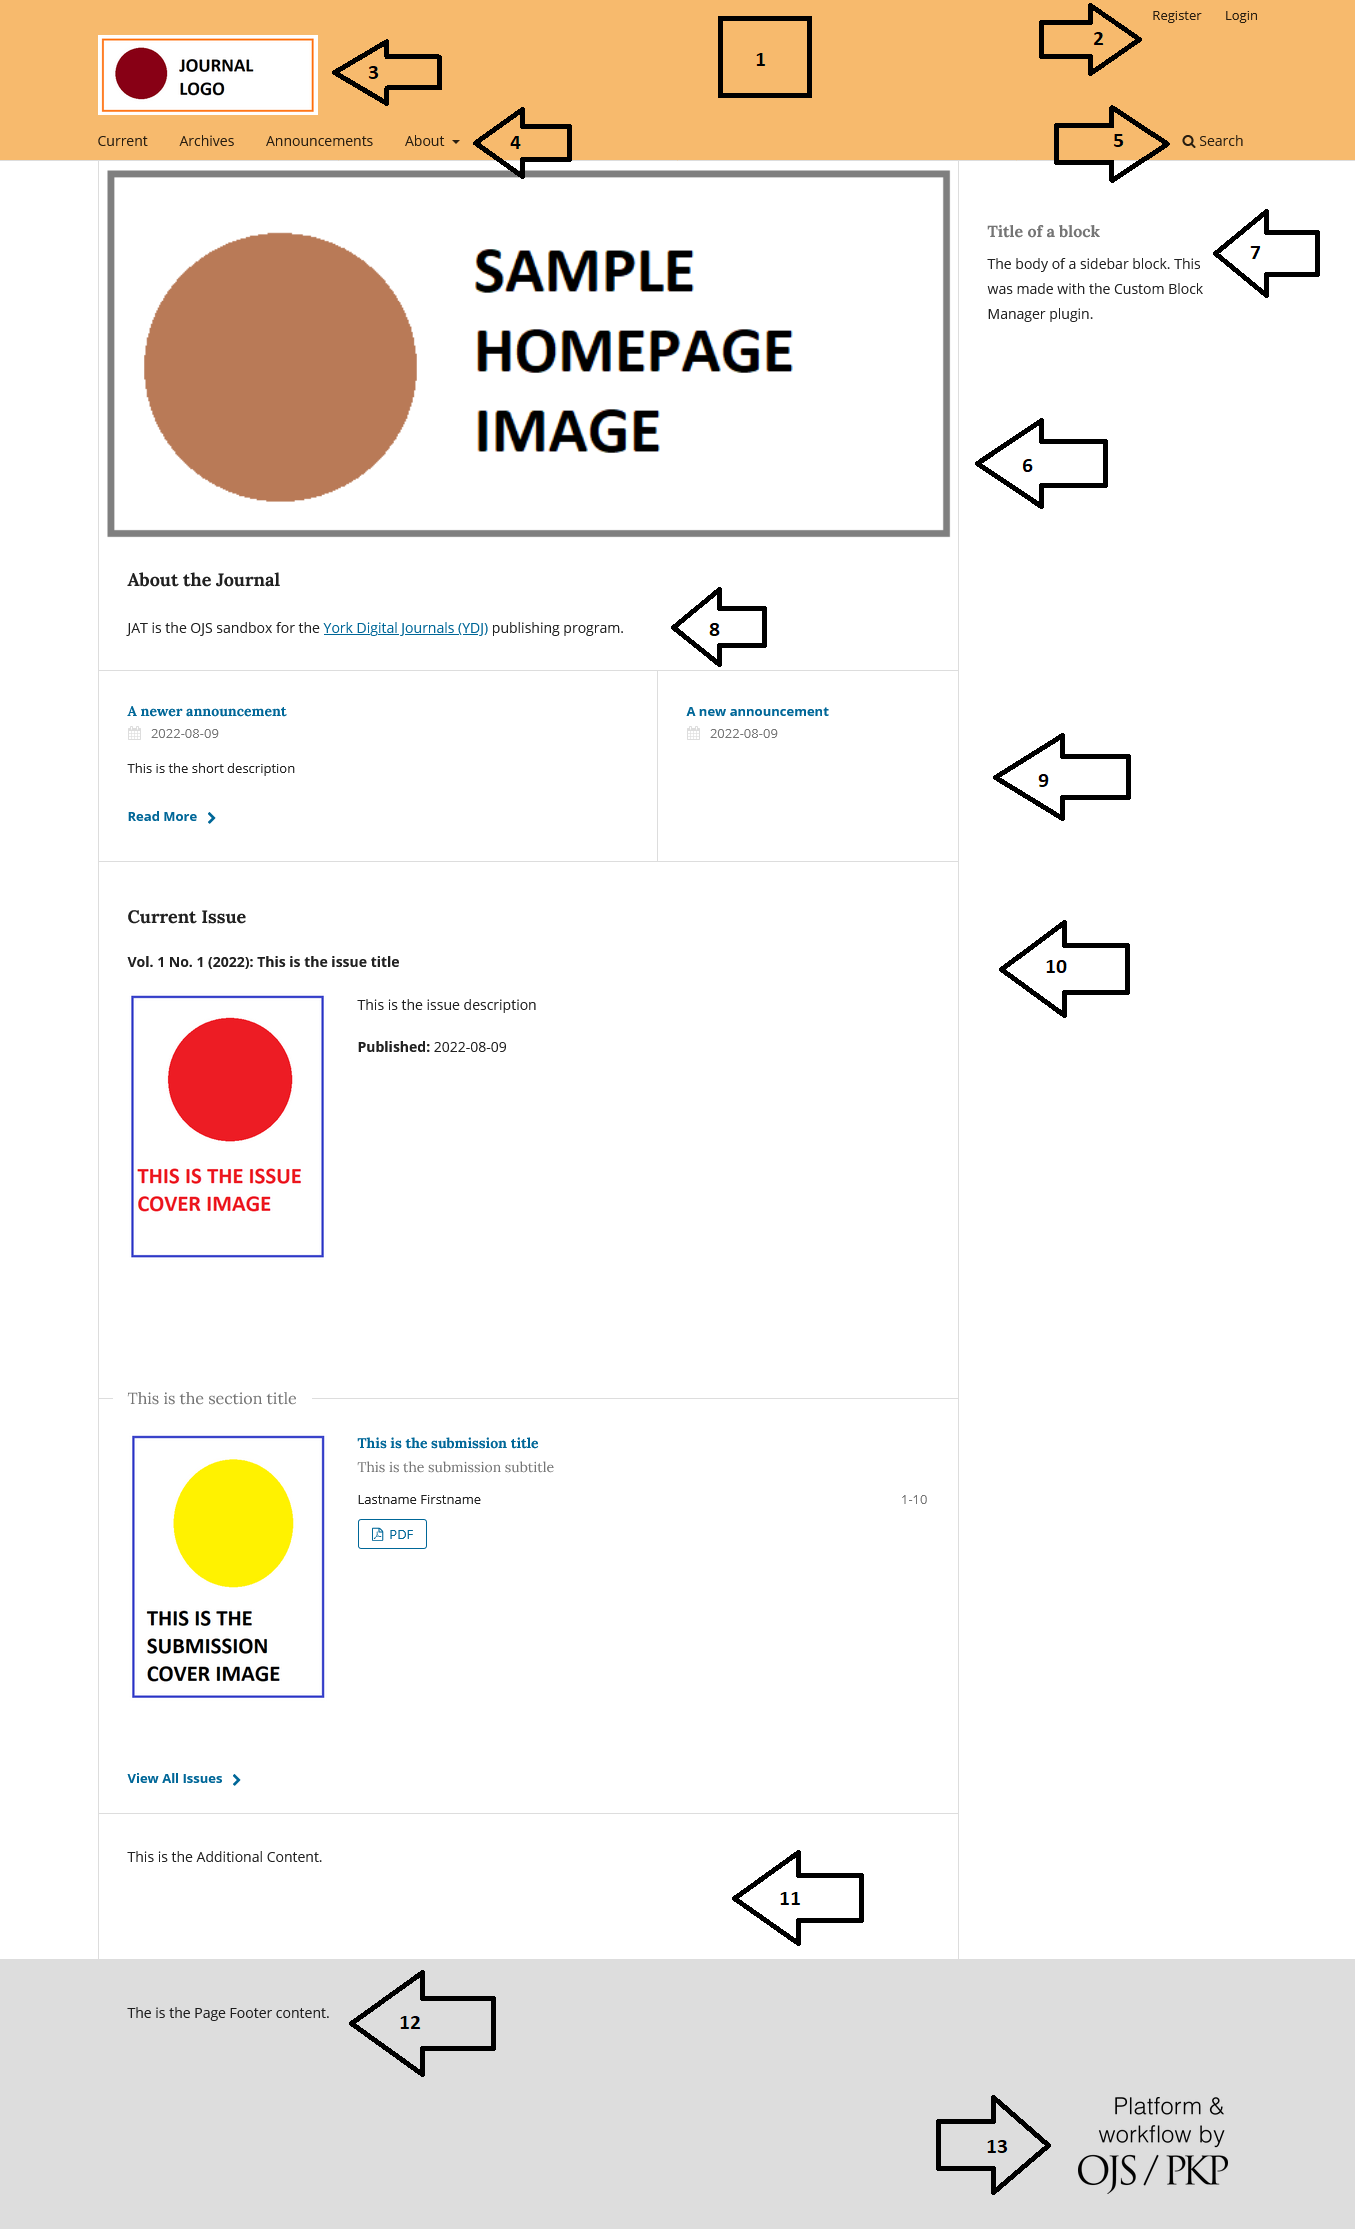
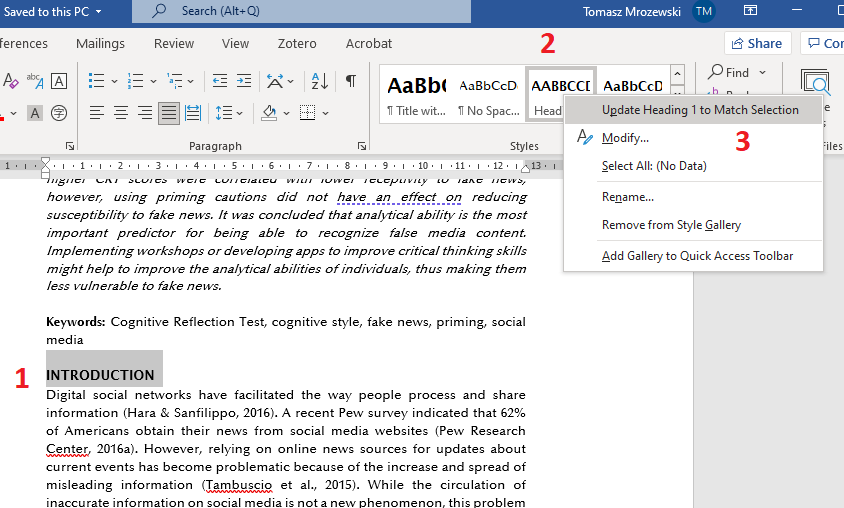
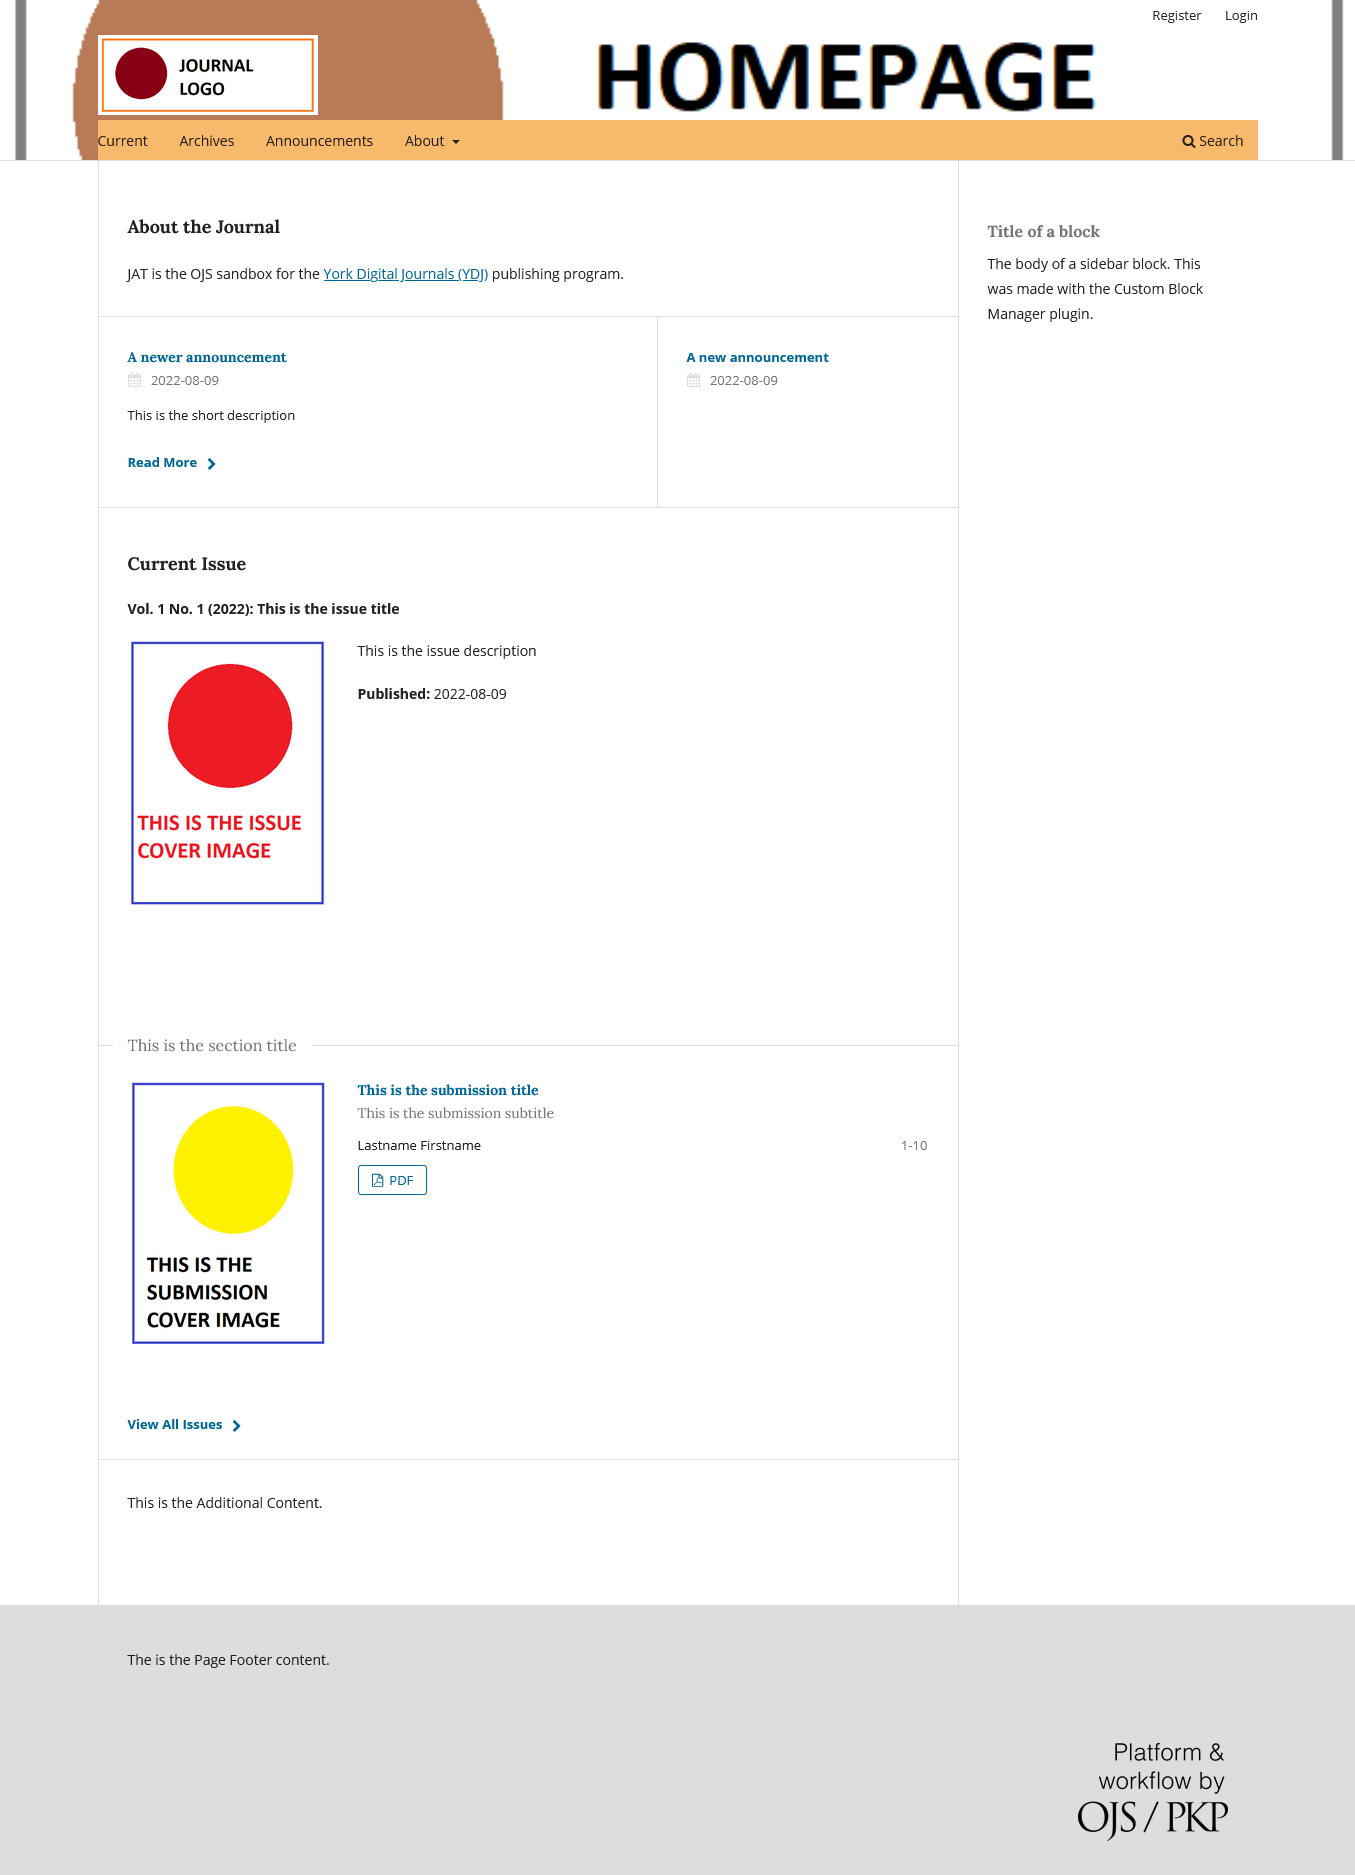
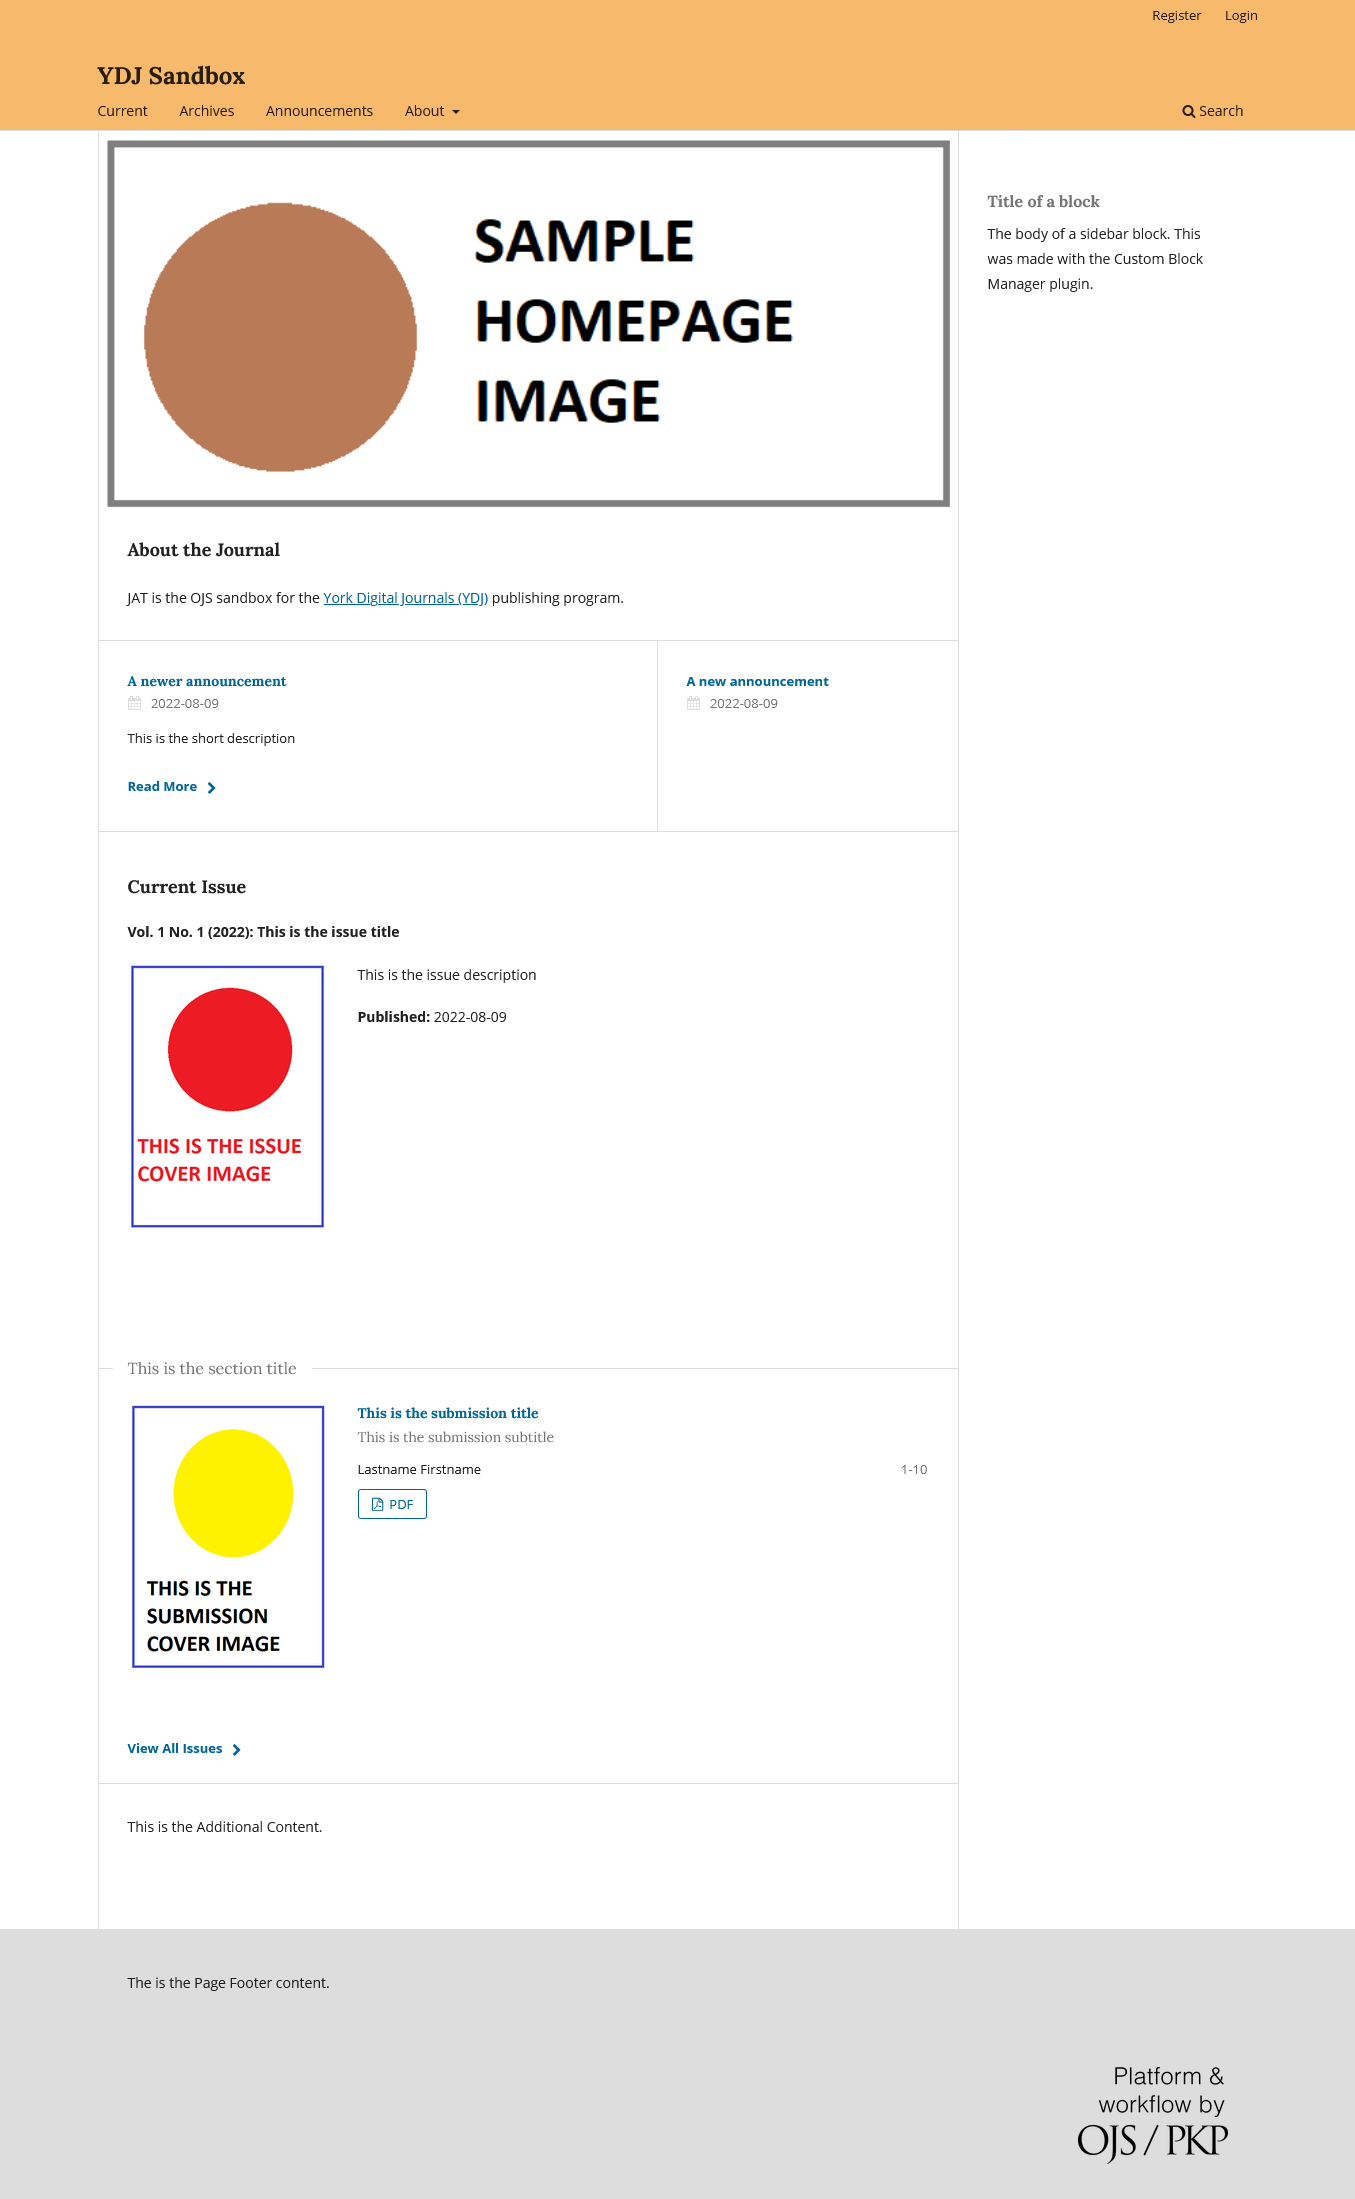
				 <div class="textbox shaded"><strong>Last updated:</strong> August 9, 2022 for OJS 3.3.0.11</div> <p>This chapter provides an overview of all possible elements that appear on the homepage of a journal using the OJS Default Theme. This chapter only discusses the layout of the homepage as viewed on a large screen, such as a computer or large tablet.</p> <h2>OJS homepage layout (Default Theme)</h2> <p>The page elements labeled in this screenshot are described in the next section.</p> <p><a href="https://pressbooks.library.yorku.ca/ojsforydj/wp-content/uploads/sites/94/2022/08/hompage-logo-ANNOTATED.png" data-url="https://pressbooks.library.yorku.ca/ojsforydj/wp-content/uploads/sites/94/2022/08/hompage-logo-ANNOTATED.png"><img src="https://pressbooks.library.yorku.ca/ojsforydj/wp-content/uploads/sites/94/2022/08/hompage-logo-ANNOTATED-622x1024.png" alt="Annotated screenshot of the OJS homepage showing the relative location of site elements" width="622" height="1024" class="aligncenter size-large wp-image-313" srcset="https://pressbooks.library.yorku.ca/ojsforydj/wp-content/uploads/sites/94/2022/08/hompage-logo-ANNOTATED-622x1024.png 622w, https://pressbooks.library.yorku.ca/ojsforydj/wp-content/uploads/sites/94/2022/08/hompage-logo-ANNOTATED-182x300.png 182w, https://pressbooks.library.yorku.ca/ojsforydj/wp-content/uploads/sites/94/2022/08/hompage-logo-ANNOTATED-768x1263.png 768w, https://pressbooks.library.yorku.ca/ojsforydj/wp-content/uploads/sites/94/2022/08/hompage-logo-ANNOTATED-934x1536.png 934w, https://pressbooks.library.yorku.ca/ojsforydj/wp-content/uploads/sites/94/2022/08/hompage-logo-ANNOTATED-1245x2048.png 1245w, https://pressbooks.library.yorku.ca/ojsforydj/wp-content/uploads/sites/94/2022/08/hompage-logo-ANNOTATED-65x107.png 65w, https://pressbooks.library.yorku.ca/ojsforydj/wp-content/uploads/sites/94/2022/08/hompage-logo-ANNOTATED-225x370.png 225w, https://pressbooks.library.yorku.ca/ojsforydj/wp-content/uploads/sites/94/2022/08/hompage-logo-ANNOTATED-350x576.png 350w, https://pressbooks.library.yorku.ca/ojsforydj/wp-content/uploads/sites/94/2022/08/hompage-logo-ANNOTATED.png 1355w" sizes="auto, (max-width: 622px) 100vw, 622px" title="" /></a></p> <h2>Legend: components of the homepage</h2> <h3>1. Header OR header background image</h3> <p>By default, OJS displays a coloured header at the top of the page that spans the entire window. The colour can be configured via <strong>Website Settings &gt; Appearance &gt; Theme</strong>, using the <strong>Colour</strong> field.</p> <p>You can replace the entire header with an image if you follow two steps:</p> <ol><li>Add a homepage image in <strong>Website Settings &gt; Appearance &gt; Setup&nbsp;</strong>in the <strong>Homepage Image</strong> field</li> <li>Click the checkbox under <strong>Header Background Image</strong> in <strong>Website Settings &gt; Appearance &gt; Theme.</strong></li> </ol> <p>If you use this option, you cannot have a regular homepage image (#6 below).</p> <p>The screenshot on this page shows a journal homepage with the homepage image in the default location. You can also see an <a href="https://pressbooks.library.yorku.ca/ojsforydj/wp-content/uploads/sites/94/2022/08/homepage-logo-background.png" data-url="https://pressbooks.library.yorku.ca/ojsforydj/wp-content/uploads/sites/94/2022/08/homepage-logo-background.png">example of the same journal with the homepage image used as a header background</a>.</p> <p>The header or header background image persist across all pages on the OJS site.</p> <h3>2. User navigation menu</h3> <p>The user navigation menu appears at the top right of the screen, against the backdrop of the header. When the visitor is logged out, this menu displays <strong>Register</strong> and <strong>Login</strong> buttons. When logged in, it displays the username as a dropdown menu with the links <strong>Dashboard</strong>, <strong>View Profile</strong>, and <strong>Logout</strong>.</p> <p>The user navigation menu can be configured via <strong>Website Settings &gt; Setup &gt; Navigation</strong>, using the <strong>Navigation</strong> and Navigation Menu Items fields.</p> <p>The user navigation menu persists across all pages on the OJS site.</p> <h3>3. Title OR logo</h3> <p>By default, OJS displays the title of the journal as an H1-level heading at the top left of the page, against the backdrop of the header. The title is configured via <strong>Journal Settings &gt; Masthead</strong>, using the <strong>Journal title</strong> field.</p> <p>You can display a logo image instead of the title of the journal. The logo is configured via <strong>Website Settings &gt; Appearance &gt; Setup</strong>, using the <strong>Logo</strong> field.</p> <p>The screenshot on this page shows a journal homepage with a logo instead of the journal title. You can also see an <a href="https://pressbooks.library.yorku.ca/ojsforydj/wp-content/uploads/sites/94/2022/08/homepage-nologo.png" data-url="https://pressbooks.library.yorku.ca/ojsforydj/wp-content/uploads/sites/94/2022/08/homepage-nologo.png">example of the same journal with the journal title instead of a logo.</a></p> <p>The title or logo persist across all pages on the OJS site.</p> <h3>4. Primary navigation menu</h3> <p>The primary navigation menu appears under the journal title or logo, against the backdrop of the header and aligned to the left margin.</p> <p>The primary navigation menu can be configured via <strong>Website Settings &gt; Setup &gt; Navigation</strong>, using the <strong>Navigation</strong> and Navigation Menu Items fields.</p> <p>The primary navigation menu persists across all pages on the OJS site.</p> <h3>5. Search</h3> <p>The search tool appears under the journal title or logo, against the backdrop of the header and aligned to the right margin. The search tool cannot be configured.</p> <p>The search tool persists across all pages on the OJS site.</p> <h3>6. Homepage image</h3> <p>The homepage image is an optional element. It will only appear if an image has been uploaded to <strong>Homepage Image</strong> in <strong>Website Settings &gt; Appearance &gt; Setup</strong>. The homepage image will appear in the central pane of the page, below the header.</p> <p>The homepage image will only be displayed on the homepage.</p> <p>The homepage image can also be used to replace the coloured header (#1 above) if you upload an image and click the checkbox under <strong>Header Background Image</strong> in <strong>Website Settings &gt; Appearance &gt; Theme</strong>. If you use this option, you cannot have a regular homepage image.</p> <h3>7. Blocks</h3> <p>Blocks appear in the right sidebar, below the header. Multiple blocks display in sequence vertically. Blocks are configured via <strong>Website Settings &gt; Appearance &gt; Setup</strong> using the <strong>Sidebar</strong> field. Some <a href="#chapter-managing-plugins" data-url="https://pressbooks.library.yorku.ca/ojsforydj/chapter/managing-plugins/">plugins</a> may add blocks to your sidebar. You can also <a href="#chapter-adding-custom-blocks-right-sidebar" data-url="https://pressbooks.library.yorku.ca/ojsforydj/chapter/adding-custom-blocks-right-sidebar/">create custom blocks</a> for your site.</p> <p>Blocks persist across all pages of the OJS site.</p> <h3>8. Journal Summary</h3> <p>The journal summary is an optional element. If activated, the journal summary will appear in the central pane of the page, below the header. If a Homepage image is present (#7), it will appear below that image.</p> <p>OJS automatically adds the heading “About the Journal” when the journal summary appears.</p> <p>You can activate the journal summary if you follow two steps:</p> <ol><li>Add the summary text in <strong>Journal Settings &gt; Masthead</strong> using the <strong>Journal Summary</strong> field</li> <li>Click the checkbox under <strong>Journal Summary</strong>&nbsp;in <strong>Website Settings &gt; Appearance &gt; Theme.</strong></li> </ol> <p>The journal summary will only be displayed on the homepage.</p> <h3>9. Announcements</h3> <p>Announcements are an optional element. If activated, announcements will appear in the central pane of the page, below the header. If a homepage image (#7) or journal summary (#8) are present, it will appear below these elements.</p> <p>You can activate announcements if you click the checkbox under <strong>Announcements</strong>&nbsp;in <strong>Website Settings &gt; Setup &gt; Announcements </strong>and click <strong>Save. </strong>You can then add announcements via&nbsp;<strong>Announcements </strong>in the left sidebar menu.</p> <p>Even if announcements are activated, the announcement elements will <em>not</em> appear on the homepage if:</p> <ul><li>The number in the <strong>Display on Homepage</strong> field on <strong>Website Settings &gt; Setup &gt; Announcements&nbsp;</strong>is set to 0, or</li> <li>No announcements have been published, or</li> <li>All published announcements have expired.</li> </ul> <p>The announcements element will only be displayed on the homepage. However, activating the announcements feature will create a new page called Announcements and automatically added to it the primary navigation menu.</p> <h3>10. Current Issue</h3> <p>By default, OJS displays the journal’s <span class="glossary-term">Current Issue</span> on the homepage. The current issue announcements appears in the central pane of the page, below the header. If a homepage image (#7), a journal summary (#8), or announcements (#10) are present, it will appear below these elements.</p> <p>The current issue element displays the full issue metadata and table of contents, include:</p> <ul><li>Issue cover, if present</li> <li>Issue volume, number, year, and title as applicable</li> <li>Issue description, if present</li> <li>Issue publication date</li> <li>Section titles for all sections included in the issue</li> <li>Submission covers for all submissions, if present</li> <li>Submission titles for all submissions and subtitles, if present</li> <li>Submission contributors for all submissions</li> <li>Submission page numbers for all submissions, if present</li> <li>Submission galley links for all submissions</li> </ul> <p>OJS automatically adds the heading “Current Issue” to the top of this element and adds a link to the Archive labeled “View All Issues” to the bottom.</p> <p>By default, your Current Issue is your most recently published issue; however, you can also <a href="#chapter-setting-your-current-issue" data-url="https://pressbooks.library.yorku.ca/ojsforydj/chapter/setting-your-current-issue/">change your Current Issue</a>.</p> <p>The current issue element will only be displayed on the homepage.</p> <h3>11. Additional Content</h3> <p>Additional content is an optional element. It will only appear if content has been added to <strong>Additional Content</strong> in <strong>Website Settings &gt; Appearance &gt; Advanced</strong>. The additional content will appear in the central pane of the page, below the current issue.</p> <p>Additional content will only be displayed on the homepage.</p> <h3>12. Page Footer</h3> <p>By default, OJS displays a light grey footer at the bottom of the page that spans the entire window. The colour cannot be configured.</p> <p>You can add content to the page footer via <strong>Website Settings &gt; Appearance &gt; Setup</strong>, using the <strong>Page Footer</strong> field.</p> <p>The page footer persists across all pages on the OJS site.</p> <h3>13. PKP logo</h3> <p>By default, OJS displays the logo of the software developer, PKP, in the bottom left corner of the page against the backdrop of the footer. This logo cannot be configured.</p> <p>The PKP logo persists across all pages on the OJS site.</p> 
	</div>


	</div>
<div class="chapter standard with-subsections" id="chapter-managing-appearance" title="Managing your site's appearance">
	<div class="chapter-title-wrap">
		<p class="chapter-number">2</p>
		<h1 class="chapter-title">Managing your site's appearance</h1>
								</div>
	<div class="ugc chapter-ugc">
				 <div class="textbox shaded"><strong>Last updated:</strong> October 21, 2025 for OJS 3.3.0.19</div> <p>This chapter covers the different elements of OJS that affect the appearance and layout of your site. This chapter complements the information presented in the PKP guide <a href="https://docs.pkp.sfu.ca/designing-your-journal/en/" data-url="https://docs.pkp.sfu.ca/designing-your-journal/en/">Designing Your Journal</a> and in the <a href="https://docs.pkp.sfu.ca/learning-ojs/en/settings-website" data-url="https://docs.pkp.sfu.ca/learning-ojs/en/settings-website">Website Settings section</a> of <a href="https://docs.pkp.sfu.ca/learning-ojs/en/" data-url="https://docs.pkp.sfu.ca/learning-ojs/en/">Learning OJS 3.3</a>; this chapter links to the relevant sections from those guides throughout.</p> <p>OJS uses <a href="https://en.wikipedia.org/wiki/Responsive_web_design" data-url="https://en.wikipedia.org/wiki/Responsive_web_design">responsive web design</a>, which means that site elements will automatically rescale and rearrange to fit larger or smaller browser windows. You can see how this works on a computer by manually resizing your browser window. There is no mobile version of the OJS website: the site automatically optimizes for viewing according to the browser size. This chapter uses “large browser window” to refer to the experience a user would have on a computer with a maximized browser window or a large tablet; it uses “small browser window” to refer to the experience a user would have on a phone, a small tablet, or a computer with a small browser window.</p> <p>There are five ways you can affect the overall look and feel of your OJS site:</p> <ul><li><a href="#appearance_universal" data-url="https://pressbooks.library.yorku.ca/ojsforydj/chapter/managing-appearance/#appearance_universal">General settings</a></li> <li><a href="#appearance_theme" data-url="https://pressbooks.library.yorku.ca/ojsforydj/chapter/managing-appearance/#appearance_theme">Theme and theme settings</a></li> <li><a href="#appearance_navigation" data-url="https://pressbooks.library.yorku.ca/ojsforydj/chapter/managing-appearance/#appearance_navigation">Navigation menus</a></li> <li><a href="#appearance_blocks" data-url="https://pressbooks.library.yorku.ca/ojsforydj/chapter/managing-appearance/#appearance_blocks">Sidebar blocks</a></li> <li><a href="#appearance_stylesheets" data-url="https://pressbooks.library.yorku.ca/ojsforydj/chapter/managing-appearance/#appearance_stylesheets">Stylesheets</a></li> </ul> <h2><a id="appearance_universal" data-url=""></a>General settings</h2> <p>Some elements that appear on the site are common to all journals, regardless of theme. These are controlled via <strong>Website Settings &gt; Appearance &gt; Setup</strong> and <strong>Website Settings &gt; Appearance &gt; Advanced.</strong></p> <p>The elements controled via <strong>Website Settings &gt; Appearance &gt; Setup</strong> are:</p> <ul><li><strong>Logo</strong>: an image that will appear in the header of any page on your site.. If you do not use a logo, the title of your journal will appear here as text.</li> <li><strong>Journal thumbnail</strong>: this setting is not used for YDJ journals and is not necessary for your journal.</li> <li><strong>Homepage Image</strong>: an image that will appear on the homepage of your site, unless the Homepage Background Image toggle (described below) is used.</li> <li><strong>Page Footer</strong>: text or other content that will appear on the footer of any page on your site.</li> <li><strong>Sidebar</strong>: sidebar blocks will be discussed in a separate section on this page.</li> </ul> <p>The elements controled via <strong>Website Settings &gt; Appearance &gt; Advanced</strong>&nbsp;are:</p> <ul><li><span><strong>Journal style sheet</strong>: this setting will be discussed in a separate section on this page.</span></li> <li><strong>Favicon</strong>: upload a <a href="https://en.wikipedia.org/wiki/Favicon" data-url="https://en.wikipedia.org/wiki/Favicon">favicon</a> for your journal.</li> <li><strong>Additional Content</strong>: text or other content that will appear at the bottom of the content page of your homepage only.</li> </ul> <p>You can read more about <a href="https://docs.pkp.sfu.ca/learning-ojs/en/settings-website#setup" data-url="https://docs.pkp.sfu.ca/learning-ojs/en/settings-website#setup">Appearance Setup</a> and <a href="https://docs.pkp.sfu.ca/learning-ojs/en/settings-website#advanced" data-url="https://docs.pkp.sfu.ca/learning-ojs/en/settings-website#advanced">Advanced Appearance</a> settings in Learning OJS 3.3.</p> <h2><a id="appearance_theme" data-url=""></a>Theme and theme settings</h2> <p>Many elements of the OJS website are controlled by theme and the theme settings. These are configured through&nbsp;<strong>Website Settings &gt; Appearance &gt; Theme.&nbsp;</strong>When using the Default Theme, these settings are:</p> <ul><li><strong>Typography</strong>: font combinations used on the site.</li> <li><strong>Colour</strong>: the colour of the site header.</li> <li><strong>Journal Summary</strong>: toggle whether the Journal Summary appears on the homepage.</li> <li><strong>Header Background Image</strong>: toggle whether the homepage image (if applicable) appears as the background of the header or in the main content pane.</li> </ul> <p>YDJ prefers that participating journals use the Default Theme for two reasons:</p> <ol><li>The Default Theme has been audited for accessibility and simplifies journals’ requirement to comply with the <em>Accessibility for Ontarians with Disabilities Act</em> (AODA), whereas other themes may present accessibility issues, and</li> <li>Themes other than Default are not always updated with the core OJS software and may not render or function properly when YDJ upgrades your journal to a new version of the software.</li> </ol> <p>If you wish to use or try out different themes for your journal, please contact the Digital Publishing Librarian. Themes are implemented as <a href="#chapter-managing-plugins" data-url="https://pressbooks.library.yorku.ca/ojsforydj/chapter/managing-plugins/">plugins</a> and you will not be able to implement them without assistance. YDJ cannot customize themes or fix any problems with non-Default themes that may arise.</p> <p>You can read more about <a href="https://docs.pkp.sfu.ca/learning-ojs/en/settings-website#theme" data-url="https://docs.pkp.sfu.ca/learning-ojs/en/settings-website#theme">Theme settings</a> in Learning OJS 3.3 and about <a href="https://docs.pkp.sfu.ca/designing-your-journal/en/theme-features-design-elements" data-url="https://docs.pkp.sfu.ca/designing-your-journal/en/theme-features-design-elements">Theme Features and Design Elements</a> in Designing Your Journal. If you have access to development expertise, you can read about creating or modifying themes in the <a href="https://docs.pkp.sfu.ca/pkp-theming-guide/en/" data-url="https://docs.pkp.sfu.ca/pkp-theming-guide/en/">PKP Theming Guide</a>.</p> <h2><a id="appearance_navigation" data-url=""></a>Navigation menus</h2> <p>There are two navigation menus in the OJS Default Theme: the User Navigation Menu and the Primary Navigation Menu. Both menus are configured via <strong>Website Settings &gt; Setup &gt; Navigation</strong>. These menus may be rearranged; items may also be added or removed.</p> <p>The <strong>User Navigation Menu</strong> contains a login link when site visitors are logged out or, when logged in, links related to their OJS user account. It appears at the top right of all OJS site pages when viewed in a large browser window; in a small browser window, these links are accessible via the hamburger menu at the top of the page.</p> <p>The <strong>Primary Navigation Menu</strong> contains links to the public-facing site content, including About the Journal, Submissions, and Archives. It appears at the bottom of the site header on all OJS site pages when viewed in a large browser window; in a small browser window, these links are accessible via the hamburger menu at the top of the page alongsite the User Navigation Menu links.</p> <p>You can edit each menu by rearranging, adding, and removing menu items. Be careful when removing menu items, lest you make important parts of the website inaccessible to readers. Adding a new&nbsp;<strong>Navigation Menu Item</strong> creates a new page on the OJS site that can be added to a menu.</p> <p>You can read more about <a href="https://docs.pkp.sfu.ca/learning-ojs/en/settings-website#navigation" data-url="https://docs.pkp.sfu.ca/learning-ojs/en/settings-website#navigation">Navigation settings</a> in Learning OJS 3.3.</p> <div class="textbox shaded"><p><strong>Caution!</strong></p> <p>If you create a new page through the navigation menu,&nbsp;<em>test your intended URL path first</em> to ensure that you don’t create a site-breaking URL conflict.</p> </div> <h2><a id="appearance_blocks" data-url=""></a>Sidebar blocks</h2> <p><strong>Blocks</strong> are flexible content containers that can appear to the right of the main content pane on any OJS page (on a large browser window) or below it (on a small browser windows). Blocks are managed via the <strong>Sidebar</strong> settings at <strong>Website Settings &gt; Appearance &gt; Setup</strong>, where you can reorder, activate, or deactivate blocks.</p> <p>Several blocks are activated by default in OJS. Several <a href="#chapter-managing-plugins" data-url="https://pressbooks.library.yorku.ca/ojsforydj/chapter/managing-plugins/">plugins</a> will also create blocks that can be managed via the Sidebar settings. One of these plugins is the Custom Block Manager, which allows you create custom block content. Learn more about <a href="#chapter-adding-custom-blocks-right-sidebar" data-url="https://pressbooks.library.yorku.ca/ojsforydj/chapter/adding-custom-blocks-right-sidebar/">Adding custom blocks (right sidebar)</a>&nbsp;elsewhere in this guide.</p> <h2><a id="appearance_stylesheets" data-url=""></a>Stylesheets</h2> <p>You can customize the deisgn of your OJS site by adding a .css file to <strong>Journal style sheet</strong>, which is accessed via <strong>Website Settings &gt; Appearance &gt; Advanced</strong>. You can read more about stylesheets in the <a href="https://docs.pkp.sfu.ca/designing-your-journal/en/creating-stylesheet" data-url="https://docs.pkp.sfu.ca/designing-your-journal/en/creating-stylesheet">Create a Stylesheet</a> section of Designing Your Journal.</p> <p>YDJ cannot customize stylesheets or fix any problems with custom stylesheets that may arise. If your custom stylesheet causes accessibility problems, we will require you to edit your stylesheet; if the accessibility problems are serious enough, we may have to remove the stylesheet unilaterally in order to comply with AODA requirements.</p> 
	</div>


	</div>
<div class="chapter standard with-subsections" id="chapter-adding-custom-blocks-right-sidebar" title="Adding custom blocks (right sidebar)">
	<div class="chapter-title-wrap">
		<p class="chapter-number">3</p>
		<h1 class="chapter-title">Adding custom blocks (right sidebar)</h1>
								</div>
	<div class="ugc chapter-ugc">
				 <div class="textbox shaded"><strong>Last updated:</strong> November 22, 2021 for OJS 3.3.0.8</div> <p>You can create custom blocks to appear in the right sidebar by following these steps:</p> <ol><li>In the back end, go to <strong>Website</strong> &gt;&nbsp; <strong>Plugins</strong>.</li> <li>On the Installed Plugins screen, you should see plugin called <strong>Custom Block Manager </strong>in the Generic Plugins section. <ol style="list-style-type: lower-roman"><li>If you do not see the Custom Block Manager in that list, contact Tomasz to have it installed before proceeding.</li> </ol> </li> <li>Activate the Custom Block Manager by clicking the checkbox beside the plugin description.</li> <li>Once activated, click the blue triangle next to the plugin name to see the plugin options.</li> <li>Click <strong>Manage Custom Blocks</strong>.</li> <li>In the Custom Block Manager window, click <strong>Add Block</strong>.</li> <li>Add the <strong>Block Name</strong>, <strong>Content</strong>, and check <strong>Show Name</strong> if desire.</li> <li>Click <strong>Save</strong>.</li> <li>Go to <strong>Website &gt; Appearance</strong> &gt; <strong>Setup.</strong></li> <li>Activate your custom block by checking the box next to the block name in the Sidebar section.</li> <li>Drag the blocks into your preferred order.</li> <li>Click <strong>Save.</strong></li> </ol> 
	</div>


	</div>
<div class="chapter standard with-subsections" id="chapter-managing-plugins" title="Managing plugins">
	<div class="chapter-title-wrap">
		<p class="chapter-number">4</p>
		<h1 class="chapter-title">Managing plugins</h1>
								</div>
	<div class="ugc chapter-ugc">
				 <div class="textbox shaded"><strong>Last updated:</strong> October 7, 2021 for OJS 3.3.0.8</div> <p>Plugins provide extra functions in OJS. Some plugins are developed by the PKP community and are available through the OJS administrative interface; others are developed by third parties and must be uploaded manually.</p> <h2>Managing plugins</h2> <p>You can access your journal’s plugins through the <strong>Plugins</strong> tab on the <strong>Website Settings </strong>page. There, you will find two facets: Installed Plugins and Plugin Gallery.</p> <p><strong>Installed Plugins</strong> lists the plugins that are installed on your system but not necessarily activated. To activate them, you must click the checkbox to the left of the plugin’s name.</p> <p>Most of the built-in plugins for OJS are updated when the core OJS software package is updated.</p> <h2>Installing and updating plugins</h2> <p>The <strong>Plugin Gallery</strong> lists optional plugins that you can install on your system and will also display whether updates are available. Only the OJS administrator can install and update plugins – you will not be able to do this for your own journal, even if you have the Journal Manager user role. If you wish to install or upgrade a plugin, please contact your Digital Publishing Librarian.</p> <p>YDJ has not yet been able to automate the plugin update process for our journals, although we are currently working on this. Therefore, you may sometimes discover that certain plugins (such as <a href="#chapter-using-the-quicksubmit-plugin" data-url="https://pressbooks.library.yorku.ca/ojsforydj/chapter/using-the-quicksubmit-plugin/">QuickSubmit</a>) are not available due to an update being required. If this happens, please contact your Digital Publishing Librarian.</p> <h2>Third-party plugins</h2> <p>If you discover third-party plugins you wish to use, contact your Digital Publishing Librarian to discuss installing them. If YDJ has no immediately concerns about security or computing resources, we should be able to install them for you.</p> <p>YDJ cannot support the use or maintenance of third-party plugins. In other words: if the plugin doesn’t work with the current version of OJS, or if the plugin doesn’t work as expected, or if you can’t figure out to use the plugin, we will be unable to support you. Additionally, if YDJ discovers that there is a major security concern with the plugin, we may have to unilaterally uninstall it.</p> 
	</div>


	</div>
<div class="chapter standard with-subsections" id="chapter-web-and-readership-statistics" title="Web and readership statistics">
	<div class="chapter-title-wrap">
		<p class="chapter-number">5</p>
		<h1 class="chapter-title">Web and readership statistics</h1>
								</div>
	<div class="ugc chapter-ugc">
				 <div class="textbox shaded"><strong>Last updated:</strong> September 27, 2024 for OJS 3.3 and OJS 3.4</div> <p>This chapter covers two types of statistics:</p> <ul><li><a href="#Article and editorial stats" data-url="https://pressbooks.library.yorku.ca/ojsforydj/chapter/web-and-readership-statistics/#Article and editorial stats">Article and editorial statistics</a>, which are collected and accessed through OJS itself, and</li> <li><a href="#Web analytics" data-url="https://pressbooks.library.yorku.ca/ojsforydj/chapter/web-and-readership-statistics/#Web analytics">Web analytics</a>, which are collected by third-party applications.</li> </ul> <h2><a data-url=""></a>Article and editorial stats</h2> <p>OJS offers robust statistical reporting tools for article views and downloads and for editorial activity as of version 3.2.</p> <p>You can l<a href="https://docs.pkp.sfu.ca/learning-ojs/en/statistics" data-url="https://docs.pkp.sfu.ca/learning-ojs/en/statistics">earn about OJS’ built-in statistics reports</a> in the <em>Learning OJS 3</em> guide.</p> <h2><a data-url=""></a>Web analytics</h2> <p>There are several alternatives available for getting web traffic stats (also called analytics) for your OJS site. YDJ creates all instances of OJS with an open-source analytics package called <strong>AWStats</strong>. Some journals were also configured with <strong>Google Analytics Universal Analytics</strong>; however, there were major privacy implications to using Google and Universal Analytics was shut down in 2024. In 2023, YDJ switched to a locally-hosted hosted instance of <strong>Matomo</strong> to provide more granular analytics while respecting user privacy; as of the end of 2023, all YDJ journals are configured with Matomo.</p> <p>You should know that analytics packages such as Google Analytics and Matomo only provide statistics as of the date of their implementation.</p> <h3>Matomo</h3> <p>YUL has implemented a locally-hosted instance of <a href="https://matomo.org/" data-url="https://matomo.org/">Matomo</a> for all journals as an alternative to Google Analytics. As for the end of 2023, Matomo has been configured for all YDJ publications. YDJ does not currently have standardized reporting procedures: if you would like to request stats from Matomo, please contact the Digital Publishing Librarian.</p> <h3>AWStats</h3> <p>All instances of OJS created by YDJ include <a href="https://awstats.sourceforge.io/" data-url="https://awstats.sourceforge.io/">AWStats</a>.</p> <p>You can access AWStats for your journal by adding the text /awstats/awstats.pl after “yorku.ca” in your journal’s domain. Table 1 shows how to access AWStats using YDJ’s OJS sandbox as an example.</p> <table style="border-collapse: collapse;width: 100%;height: 75px"><caption>Table 1: How to access AWStats URL for a YDJ journal</caption> <tbody><tr style="height: 15px"><td style="width: 50%;height: 15px">Journal domain</td> <td style="width: 50%;height: 15px">https://jat.journals.yorku.ca</td> </tr> <tr style="height: 15px"><td style="width: 50%;height: 15px">AWStats URL</td> <td style="width: 50%;height: 15px">https://jat.journals.yorku.ca/awstats/awstats.pl</td> </tr> </tbody> </table> <h3>Google Analytics</h3> <p>Some YDJ journals created in OJS prior to 2019 used <a href="https://analytics.google.com" data-url="https://analytics.google.com">Google Analytics Universal Analytics</a>, which was shut down in 2024. YDJ created a dedicated Google account to track analytics for each of these journals. If you wish to attempt to retrieve any remaining data in Google Analytics, please contact the Digital Publishing Librarian.</p> 
	</div>


	</div>
<div class="chapter standard with-subsections" id="chapter-changing-user-roles" title="Changing user roles">
	<div class="chapter-title-wrap">
		<p class="chapter-number">6</p>
		<h1 class="chapter-title">Changing user roles</h1>
								</div>
	<div class="ugc chapter-ugc">
				 <div class="textbox shaded"><strong>Last updated</strong>: April 19, 2022 for OJS 3.3.0.10</div> <p>To change the roles assigned to any user account, including your own:</p> <ol><li>In the left navigation menu, click <strong>Users &amp; Roles</strong> (under Settings)</li> <li>Search or browse to locate the account you wish to edit</li> <li>Click the blue triangle to the left of the user name and then click <strong>Edit User</strong></li> <li>In the Edit User window, scroll down to User Roles and check/uncheck the roles as required</li> <li>Click <strong>OK </strong>to save your changes.</li> </ol> <p>You must have the Journal Manager or Journal Editor role in order change user roles. However, you will not be able to change the YDJ admin account or certain special accounts created by and for YDJ staff.</p> 
	</div>


	</div>
<div class="chapter standard with-subsections" id="chapter-reviewing-user-roles" title="Reviewing user roles">
	<div class="chapter-title-wrap">
		<p class="chapter-number">7</p>
		<h1 class="chapter-title">Reviewing user roles</h1>
								</div>
	<div class="ugc chapter-ugc">
				 <div class="textbox shaded"><strong>Last updated:</strong> April 19, 2022 for OJS 3.3.0.10</div> <p>Certain <a href="https://docs.pkp.sfu.ca/learning-ojs/en/users-and-roles" data-url="https://docs.pkp.sfu.ca/learning-ojs/en/users-and-roles">user roles</a> in OJS grant permissions to make major changes to the OJS site or to publish and unpublish content. <strong>Journal Manager</strong>, <strong>Journal Editor</strong>, and <strong>Production Editor</strong> are the roles with the most permissions to make changes to the site and content. <strong>Section Editor</strong> and <strong>Guest Editor</strong> may also affect site content to a less degree.</p> <p>For security’s sake, it is important to make sure that users do not retain these roles if they no longer occupy editorial positions for your journal. You should ensure that only current editorial staff for your journal have these roles in OJS. YDJ recommends that you periodically review which users have these editorial roles, and update those users’ accounts as required.</p> <p>You must have the Journal Manager or Journal Editor role to view user accounts.</p> <p>To review all user accounts that have a particular role:</p> <ol><li>In the left-hand navigation menu, click <strong>Users &amp; Roles</strong> under&nbsp;<em>Settings</em></li> <li>Click the <strong>Search</strong> button</li> <li>Use the drop-down menu to select the role you wish to review (the default is <em>All Roles</em>)</li> <li>Leave the text box blank and click&nbsp;<strong>Search.</strong></li> </ol> <p>You will now see a list of all user accounts that have this this role assigned. You can now <a href="#chapter-changing-user-roles" data-url="https://pressbooks.library.yorku.ca/ojsforydj/chapter/changing-user-roles/">update user roles</a> as required.</p> <p><strong>Note:</strong> YDJ maintains an admin account for all journals, which is required for hosting. Periodically, YDJ will create additional accounts for troubleshooting or for special projects – we will generally inform you if this is required and will usually use descriptive usernames to identify these accounts.. We also have a policy of periodically reviewing and, if necessary, removing YDJ staff accounts. If you see any accounts that should not have editorial privileges for your journal, you should update them accordingly.</p> 
	</div>


	</div>
<div class="chapter standard with-subsections" id="chapter-configuring-subscription-settings" title="Configuring subscription settings">
	<div class="chapter-title-wrap">
		<p class="chapter-number">8</p>
		<h1 class="chapter-title">Configuring subscription settings</h1>
								</div>
	<div class="ugc chapter-ugc">
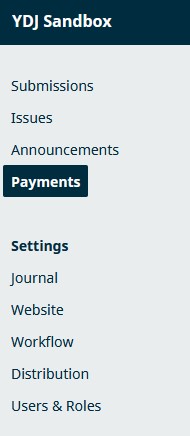
				 <div class="textbox shaded"><strong>Last updated:</strong> January 24, 2022 for OJS 3.3.0.8</div> <p>This page tells you how to configure the 2 parts of OJS required to properly use the subscription module:</p> <ol><li><a href="#distro-payments" data-url="https://pressbooks.library.yorku.ca/ojsforydj/chapter/configuring-subscription-settings/#distro-payments">The Payments tab under Distribution Settings</a>, and</li> <li><a href="#payments-page" data-url="https://pressbooks.library.yorku.ca/ojsforydj/chapter/configuring-subscription-settings/#payments-page">The Payments page in the left-hand menu</a>.</li> </ol> <p>You must enable payments via Distribution &gt; Payments in order for the Payments <em>page</em> to appear.</p> <p>You must complete both of these tasks for the Subscriptions page to appear on the front-end of the OJS site. By default, Subscriptions will appear in the About menu. If a link to the Subscriptions page does not appear under the About menu, you should ensure that both of these tasks are complete. You should also ensure that Subscriptions appears in the Assigned Menu Items list of your <a href="https://docs.pkp.sfu.ca/learning-ojs/en/settings-website#navigation" data-url="https://docs.pkp.sfu.ca/learning-ojs/en/settings-website#navigation">navigation menu</a>.</p> <h2><a id="distro-payments" data-url=""></a>Distribution &gt; Payments</h2> <ol><li>In the back end, click <strong>Distribution </strong>in the left-hand menu</li> <li>Click on the <strong>Payments </strong>tab</li> <li>Click the checkbox under <strong>Enable. </strong>Additional content will now appear on the page</li> <li><span>Using the <b>Payment Plugins</b> dropdown, select either <strong>Paypal Fee Payment</strong> or <strong>Manual Fee Payment</strong></span></li> <li>Complete the fields for Paypal Fee Payment or Manual Fee Payment, as appropriate</li> <li>Click <strong>Save.</strong></li> </ol> <p>Once you complete step 6, a new link called <strong>Payments</strong> will appear in the left-hand navigation menu under Submissions, Issues and, if it is active, Announcements (see Figure 1).</p> <div class="wp-caption aligncenter" id="attachment_270" aria-describedby="caption-attachment-270" style="width: 131px"><a href="https://pressbooks.library.yorku.ca/ojsforydj/wp-content/uploads/sites/94/2022/01/left-menu-link-to-Payments-page.jpg" data-url="https://pressbooks.library.yorku.ca/ojsforydj/wp-content/uploads/sites/94/2022/01/left-menu-link-to-Payments-page.jpg"><img src="https://pressbooks.library.yorku.ca/ojsforydj/wp-content/uploads/sites/94/2022/01/left-menu-link-to-Payments-page-131x300.jpg" alt="The Payments link appears after the links for Submissions, Issues, and Announcements." class="size-medium wp-image-270" width="131" height="300" srcset="https://pressbooks.library.yorku.ca/ojsforydj/wp-content/uploads/sites/94/2022/01/left-menu-link-to-Payments-page-131x300.jpg 131w, https://pressbooks.library.yorku.ca/ojsforydj/wp-content/uploads/sites/94/2022/01/left-menu-link-to-Payments-page-65x149.jpg 65w, https://pressbooks.library.yorku.ca/ojsforydj/wp-content/uploads/sites/94/2022/01/left-menu-link-to-Payments-page.jpg 190w" sizes="auto, (max-width: 131px) 100vw, 131px" title="" /></a><div class="wp-caption-text" id="caption-attachment-270">Figure 1: The Payments link appears after the links for Submissions, Issues, and, Announcements (if&nbsp; active).</div></div> <h2><a id="payments-page" data-url=""></a>Payments Page</h2> <p>If you do not see the link for Payments in the left-hand menu, you must complete the steps listed under <a href="#distro-payments" data-url="https://pressbooks.library.yorku.ca/ojsforydj/chapter/configuring-subscription-settings/#distro-payments">Distribution &gt; Payments</a>, above.</p> <p>To complete setting up the subscriptions module:</p> <ol><li>In the back end, click <strong>Payments </strong>in the left-hand menu</li> <li>Create one or more subscription types: <ol style="list-style-type: lower-roman"><li>Click the <strong>Subscription Types</strong> tab</li> <li>Click <strong>Create New Subscription Type</strong> and complete the required fields to create as many subscription types as required.</li> </ol> </li> <li>Add your subscription policies: <ol style="list-style-type: lower-roman"><li>Click the <strong>Subscription Policies</strong> tab</li> <li>Complete all fields and click <strong>Save</strong>.</li> </ol> </li> <li>Optionally, add per-article and per-issue reader fees: <ol style="list-style-type: lower-roman"><li>Click <strong>Payment Types</strong></li> <li>Add a price to <strong>Purchase Issue</strong> and/or <strong>Purchase Article</strong></li> <li>Click <strong>Save</strong>.</li> </ol> </li> </ol> 
	</div>


	</div>
<div class="chapter standard with-subsections" id="chapter-adding-sections" title="Adding sections">
	<div class="chapter-title-wrap">
		<p class="chapter-number">9</p>
		<h1 class="chapter-title">Adding sections</h1>
								</div>
	<div class="ugc chapter-ugc">
				 <div class="textbox shaded"><p><strong>Last updated:</strong> August 18, 2022 for OJS 3.3.0.11</p> </div> <p>To add a new section to your journal:</p> <ol><li>Go to <strong>Journal Settings &gt; Sections</strong></li> <li>Click <strong>Create Section</strong></li> <li>Add the <strong>Section Title</strong> and <strong>Abbreviation</strong></li> <li>You may add a <strong>Section Policy</strong> if you wish. <ol><li>Note: this content will appear on the Submissions page on the front end, alongside the Submission Guidelines</li> </ol> </li> <li>Check the <strong>Section Options</strong>, as appropriate <ol><li>Note: important options with downstream implications include <strong>Will not be peer-reviewed</strong>, <strong>Do not require abstracts</strong>, and <strong>Items can only be submitted by Editors and Section Editors</strong>.</li> </ol> </li> <li>Click <strong>Save</strong>.</li> </ol> <p>The new section will now be available during the appropriate submission workflows.</p> 
	</div>


	</div>
<div class="chapter standard with-subsections" id="chapter-enabling-and-disabling-notifications" title="Enabling and disabling notifications">
	<div class="chapter-title-wrap">
		<p class="chapter-number">10</p>
		<h1 class="chapter-title">Enabling and disabling notifications</h1>
								</div>
	<div class="ugc chapter-ugc">
				 <div class="textbox shaded"><strong>Last updated</strong>: November 9, 2022 for OJS 3.3.0.13</div> <p>OJS makes several automatic notifications available to users. These notifications may be email and will also appear in the notifications section of the journal dashboard for logged-in users. Some user accounts are automatically enrolled for specific notifications based on their role – for example, journal editors are automatically enrolled for email notifications about editorial statistics.</p> <p>To turn notifications on or off:</p> <ol><li>Log into your OJS account for the journal</li> <li>In the back end, click the profile avatar icon in the top, far-right corner of the window</li> <li>Click <strong>Edit Profile</strong></li> <li>On the Profile page, open the <strong>Notifications</strong> tab</li> <li>Enable or disable notifications and email alert for specific events and announcements as required</li> <li>Click <strong>Save</strong>.</li> </ol> <p>At present, it does not appear to be possible for journal managers or editors to enable or disable notifications on behalf of users.</p> 
	</div>


	</div>

</div>
<div class="part-wrapper" id="part-submissions-wrapper">
    <div class="part  " id="part-submissions">
	<div class="part-title-wrap">
		<p class="part-number">II</p>
		<h1 class="part-title">Submissions</h1>
	</div>
	<div class="ugc part-ugc">
		<div class="textbox shaded"><strong>Last updated:</strong> September 29, 2021</div> <p>The <span class="glossary-term">submission</span> is the other key element in OJS. As a noun, “submission” is a generic term that includes articles, book reviews, and art. A submission has its own page, one or more galleys, and metadata. It will appear in the table of contents for an issue when assigned to a published issue.</p>
	</div>
			
				
	</div>
<div class="chapter standard with-subsections" id="chapter-using-the-quicksubmit-plugin" title="Using the QuickSubmit Plugin">
	<div class="chapter-title-wrap">
		<p class="chapter-number">11</p>
		<h1 class="chapter-title">Using the QuickSubmit Plugin</h1>
								</div>
	<div class="ugc chapter-ugc">
				 <div class="textbox shaded"><strong>Last updated:</strong> July 28, 2025 for OJS 3.3.0.19 and OJS 3.4.0.7</div> <p><span class="glossary-term">QuickSubmit</span> is a tool for uploading <span class="glossary-term">submissions</span> that bypasses all stages of the workflow. Use it to upload content that does not required review (such as editorials) or if you conduct your review and editorial workflow outside of OJS.</p> <p><strong>Important note:&nbsp;</strong>do&nbsp;<em>not</em> use this process to upload a single galley file of your full issue. Instead, see the instructions for <a href="#chapter-issue-galley" data-url="https://pressbooks.library.yorku.ca/ojsforydj/chapter/issue-galley/">Adding a full-issue PDF galley</a>.</p> <p>Contents:</p> <ul><li><a href="#model" data-url="https://pressbooks.library.yorku.ca/ojsforydj/chapter/using-the-quicksubmit-plugin/#model">Published or Unpublished: which option to use for your publication model</a></li> <li><a href="#finding" data-url="https://pressbooks.library.yorku.ca/ojsforydj/chapter/using-the-quicksubmit-plugin/#finding">Finding the QuickSubmit plugin</a></li> <li><a href="#uploading" data-url="https://pressbooks.library.yorku.ca/ojsforydj/chapter/using-the-quicksubmit-plugin/#uploading">Uploading submissions with the QuickSubmit plugin</a></li> <li><a href="#editing" data-url="https://pressbooks.library.yorku.ca/ojsforydj/chapter/using-the-quicksubmit-plugin/#editing">Finding and editing submissions after completing QuickSubmit</a></li> </ul> <h2 id="model">Published or Unpublished: which option to use for your publication model</h2> <p>All publication in OJS happens at the <em>issue</em> level, so using QuickSubmit alone does not necessarily publish the submission. There are three ways to publish the submission, depending on your publication model:</p> <ol><li>In Step 7 below, select <strong>Published </strong>and then, in Step 8, assign the submission to a Back Issue or the Current Issue that has already been published: when you complete the process, the submission will immediately appear online as part of that issue.</li> <li>In Step 7 below, select <strong>Published </strong>and then, in Step 8, assign the submission to a Future Issue that has not yet been published: when you complete the process, the submission will appear online when you <a href="#chapter-publishing-an-issue" data-url="https://pressbooks.library.yorku.ca/ojsforydj/chapter/publishing-an-issue/">publish the issue</a>.</li> <li>In Step 7 below, leave the selection as <strong>Unpublished</strong>: you can then <a href="#editing" data-url="https://pressbooks.library.yorku.ca/ojsforydj/chapter/using-the-quicksubmit-plugin/#editing">find the submission at a later date</a> and edit the details later to assign it to an issue.</li> </ol> <h2 id="finding">Finding the QuickSubmit plugin</h2> <p>Once logged in, click <strong>Tools</strong> in the left-hand sidebar. This brings you to the Import/Expert tab of the Tools page. You should see <strong>QuickSubmit Plugin</strong> in the list of tools – if you do not, contact the Digital Publishing Librarian to have the plugin upgraded.</p> <h2 id="uploading">Uploading submissions with the QuickSubmit plugin</h2> <p>Use the form once for each submission.</p> <ol><li>Choose <strong>Submission Language</strong>, if applicable</li> <li>Choose appropriate <strong>Section</strong></li> <li>Full title goes in <strong>Title</strong></li> <li>Add the <strong>Abstract</strong>, if applicable</li> <li>For each contributor, Click <strong>Add Contributor</strong> (button to the right of “List of Contributors”) <ol style="list-style-type: lower-roman"><li>In the Add Contributor window, enter the author’s <strong>Name</strong>.</li> <li>Under <strong>Contact</strong>, you have two options for the email address you enter: <ol style="list-style-type: lower-alpha"><li>If this is a) the first publication of the submission and b) your journal uses the ORCID plugin, you should enter the author’s email address;</li> <li>if this is not the first publication of the submission (ie, it was initially published on another platform) <em>or</em> you do not use the ORCID ID plugin, you should enter your email address or a generic address. It will not appear on the journal website and the author will not receive potentially confusing email from the system.</li> </ol> </li> <li>Select the <strong>Country</strong> (this is a mandatory field but does not appear anywhere on the website).</li> <li>Select the <strong>Contributor’s Role</strong>.</li> <li>Then, click <strong>Save</strong>.</li> <li>Repeat the Add Contributor process for all authors.</li> </ol> </li> <li>Upload the article text (the galley) under Galleys. Click <strong>Add galley</strong>. <ol style="list-style-type: lower-roman"><li>In the Create New Galley window, enter the file format under <strong>Galley Label</strong> (usually “PDF”) and ensure the <strong>Language </strong>is properly set. Click <strong>Save</strong>.</li> <li>Select the <strong>Article Component</strong>. This will almost always be <strong>Article Text</strong>. Then either drag the file from your desktop to the window or click <strong>Upload File </strong>to search for it.</li> <li>Once the file name appears in the window with a green check, click <strong>Continue</strong>.</li> <li>In the next tab, click <strong>Continue</strong>.</li> <li>In the next tab, click <strong>Continue</strong>.</li> <li>If you have galleys in other formats, repeat steps a-e with appropriate label.</li> </ol> </li> <li>Select either <strong>Unpublished</strong> or <strong>Published</strong>. (NB: the Publish/Unpublished buttons are mislabeled – they should be Scheduled/Unscheduled). <ol style="list-style-type: lower-roman"><li>If you wish to assign the submission to a Back Issue or Future Issue, select Published and continued to step 8.</li> <li>If you wish to assign the submission to an issue at a later date, select <strong>Unpublished</strong> and skip to step 10. You must then <a href="#editing" data-url="https://pressbooks.library.yorku.ca/ojsforydj/chapter/using-the-quicksubmit-plugin/#editing">find and edit the submission</a> by assigning it to an issue at a later date to publish it.</li> </ol> </li> <li>In the <strong>Schedule for publication</strong> in drop-down, select the appropriate issue. <ol style="list-style-type: lower-roman"><li>If you assign the submission to an issue that was already published, submission will be published when you click Save. If you assign the submission to a future issue, it will only be published when you publish the issue.</li> </ol> </li> <li>Enter the Date of Publication under <strong>Published</strong> (likely today’s date)<span class="footnote"><span class="footnote-indirect" data-fnref="29-1"></span></span>.</li> <li>Click <strong>Save</strong>. You will be brought to a confirmation screen.</li> </ol> <h2 id="editing">Finding and editing submissions after completing QuickSubmit</h2> <p>If you need to edit a submission after creating and saving it in QuickSubmit, you can find it in one of your submissions queues. Access your submission queues by clicking <strong>Submissions</strong> at the top of the left-hand navigation menu.</p> <ul><li>If you <em>did not</em> assign an issue in step 7, the submission will appear in <strong>All Active</strong>. If you are retrieved the submission with the same account that uploaded it, it will also appear in <strong>My Active</strong>.</li> <li>If you <em>did</em> assign and an issue in step 7, the submission will appear in the <strong>Archives</strong> queue with the Scheduled status.</li> </ul> <p>Once you find the submission in the proper queue, you can edit it. To edit the submissions:</p> <ol><li>Click <strong>View</strong> to the right of the submission entry in the queue</li> <li>Click the <strong>Publication</strong> tab to edit the submission metadata, <a href="#chapter-adding-replacing-galleys" data-url="https://pressbooks.library.yorku.ca/ojsforydj/chapter/adding-replacing-galleys/">upload or change the galley file</a>, <a href="#chapter-changing-the-section-of-a-submission" data-url="https://pressbooks.library.yorku.ca/ojsforydj/chapter/changing-the-section-of-a-submission/">change the section</a>, or assign it to an issue</li> <li>Click <strong>Save</strong> at the bottom of the screen after making any changes.</li> </ol> 
	</div>
			
				
				<div class="footnotes"><div id='29-1'><p>At the time of the latest update to this page, dates entered in QuickSubmit do not save when the submission was published: regardless of the date entered in step 8, it will be changed to the date the issue is published when you publish it. If you need to backdate submissions, please contact the Digital Publishing Librarian.</p>
</div></div>
	</div>
<div class="chapter standard with-subsections" id="chapter-adding-replacing-galleys" title="Adding and replacing galleys">
	<div class="chapter-title-wrap">
		<p class="chapter-number">12</p>
		<h1 class="chapter-title">Adding and replacing galleys</h1>
								</div>
	<div class="ugc chapter-ugc">
				 <div class="textbox shaded"><strong>Last updated</strong>: September 29 for OJS 3.3.0.8</div> <p>The <span class="glossary-term">galley</span> is the final form of the article – editing, copy edited, and laid out – that is posted to the OJS site for reading. Galleys are usually uploaded as PDFs.</p> <h2>Adding a galley</h2> <p>Galleys are not brought forward from the submission’s Workflow tab. They must be manually added to the Galleys facet of the Publication tab.</p> <p>To upload a galley for an submission:</p> <ol><li>Open the submission and navigate to the <strong>Publication</strong> tab, then to the <strong>Galleys</strong> facet.</li> <li>Click <strong>Add Galley</strong>. This opens the Create New Galley window.</li> <li>Add the <strong>Galley label</strong>. This is typically the file format.</li> <li>Select the <strong>Language</strong></li> <li>Click <strong>Save.</strong></li> <li>Select the <strong>Article Component</strong>. This is usually “Article Text.”</li> <li>Drag and drop the galley file from your desktop to upload area OR click <strong>Upload File</strong> and select the galley file from your file directory.</li> <li>Click <strong>Continue.</strong></li> <li>Rename the file if you wish, the click <strong>Continue</strong>.</li> <li>Click <strong>Complete</strong>.</li> </ol> <h2>Replacing a galley</h2> <p>If the submission has already been published, you will need to <a href="#chapter-editing-an-article-after-publication" data-url="https://pressbooks.library.yorku.ca/ojsforydj/chapter/editing-an-article-after-publication/">create a new version</a> in order to replace the galley. Replacing the galley constitutes a major change and requires a new version instead of unpublishing and republishing the submission.</p> <ol><li>Open the submission and navigate to the <strong>Publication</strong> tab, then to the <strong>Galleys</strong> facet.</li> <li>Click the blue arrow next to the galley label and click <strong>Change File</strong>.</li> <li>In the first drop-down, select the file you wish to replace.</li> <li>Drag and drop the galley file from your desktop to upload area OR click <strong>Upload File</strong> and select the galley file from your file directory.</li> <li>Click <strong>Continue.</strong></li> <li>Rename the file if you wish, the click <strong>Continue</strong>.</li> <li>Click <strong>Complete</strong>.</li> </ol> 
	</div>


	</div>
<div class="chapter standard with-subsections" id="chapter-changing-the-section-of-a-submission" title="Changing the section of a submission">
	<div class="chapter-title-wrap">
		<p class="chapter-number">13</p>
		<h1 class="chapter-title">Changing the section of a submission</h1>
								</div>
	<div class="ugc chapter-ugc">
				 <div><div class="textbox shaded"><strong>Last updated:</strong> July 26, 2021 for OJS 3.3</div> <p>&nbsp;</p> </div> <div>To change the section to which a submission is assigned:</div> <div><ol><li><span>Open the <b>Production </b>tab for the submission</span></li> <li><span>Open the <b>Issue</b> tab</span></li> <li><span>Use the drop-down menu under <b>Section</b> to change the Section.</span></li> </ol> </div> 
	</div>


	</div>
<div class="chapter standard with-subsections" id="chapter-editing-after-publication" title="Editing a submission after publication">
	<div class="chapter-title-wrap">
		<p class="chapter-number">14</p>
		<h1 class="chapter-title">Editing a submission after publication</h1>
								</div>
	<div class="ugc chapter-ugc">
				 <div class="textbox shaded"><strong>Last updated:</strong> September 12, 2022 for OJS 3.3.0.11</div> <p>Go to <strong>Submissions &gt; Archive</strong> to find a list of published <span class="glossary-term">submissions</span>. You can search for articles by name or by submission ID.</p> <p>Alternatively, you can find a link to submissions in the tables of contents of published <span class="glossary-term">issues</span> via <strong>Issues &gt; Back Issues</strong>.</p> <ol><li>Click the submission title in the Archive.</li> <li>Open the <strong>Publication</strong> tab.</li> <li>Click either <strong>Unpublish</strong> or <strong>Create New Version</strong> <ol style="list-style-type: lower-roman"><li>Use <strong>Unpublish</strong> if making minor changes or adding to the metadata of a submission (eg, updating the publication date or adding a reference list).</li> <li>Use <strong>Create New Version </strong>if you’re making more substantive changes (changing the galley file, title, or contributor info) to a submission.</li> </ol> </li> <li>Make edits in the Production sub-tabs, as required. Click <strong>Save</strong> at the bottom of each screen as you edit.</li> <li>When finished, click <strong>Schedule for Publication</strong>. The submission will be republished to the same issue.</li> </ol> <h2>Fixing the error: “the submission must be in the Copyediting or Production stages…”</h2> <p>When you attempt to republish or publish new versions of very old submissions, you may encounter an error message that says, “The submission must be in the Copyediting or Production stages before it can be published” (Figure 1). This may happen when submissions have been created and published through an earlier version of the <span class="glossary-term">QuickSubmit</span> plugin, especially in OJS 2.</p> <div class="wp-caption aligncenter" id="attachment_257" aria-describedby="caption-attachment-257" style="width: 300px"><a href="https://pressbooks.library.yorku.ca/ojsforydj/wp-content/uploads/sites/94/2021/07/Screenshot-2021-11-24-at-13-57-15-Deaville-Introduction-to-the-special-issue-spacesofidentity-net.png" data-url="https://pressbooks.library.yorku.ca/ojsforydj/wp-content/uploads/sites/94/2021/07/Screenshot-2021-11-24-at-13-57-15-Deaville-Introduction-to-the-special-issue-spacesofidentity-net.png"><img src="https://pressbooks.library.yorku.ca/ojsforydj/wp-content/uploads/sites/94/2021/07/Screenshot-2021-11-24-at-13-57-15-Deaville-Introduction-to-the-special-issue-spacesofidentity-net-300x230.png" alt="Screenshot of error message: the submission must be in the Copyediting or Production stages before it can be published." class="size-medium wp-image-257" width="300" height="230" srcset="https://pressbooks.library.yorku.ca/ojsforydj/wp-content/uploads/sites/94/2021/07/Screenshot-2021-11-24-at-13-57-15-Deaville-Introduction-to-the-special-issue-spacesofidentity-net-300x230.png 300w, https://pressbooks.library.yorku.ca/ojsforydj/wp-content/uploads/sites/94/2021/07/Screenshot-2021-11-24-at-13-57-15-Deaville-Introduction-to-the-special-issue-spacesofidentity-net-1024x784.png 1024w, https://pressbooks.library.yorku.ca/ojsforydj/wp-content/uploads/sites/94/2021/07/Screenshot-2021-11-24-at-13-57-15-Deaville-Introduction-to-the-special-issue-spacesofidentity-net-768x588.png 768w, https://pressbooks.library.yorku.ca/ojsforydj/wp-content/uploads/sites/94/2021/07/Screenshot-2021-11-24-at-13-57-15-Deaville-Introduction-to-the-special-issue-spacesofidentity-net-65x50.png 65w, https://pressbooks.library.yorku.ca/ojsforydj/wp-content/uploads/sites/94/2021/07/Screenshot-2021-11-24-at-13-57-15-Deaville-Introduction-to-the-special-issue-spacesofidentity-net-225x172.png 225w, https://pressbooks.library.yorku.ca/ojsforydj/wp-content/uploads/sites/94/2021/07/Screenshot-2021-11-24-at-13-57-15-Deaville-Introduction-to-the-special-issue-spacesofidentity-net-350x268.png 350w, https://pressbooks.library.yorku.ca/ojsforydj/wp-content/uploads/sites/94/2021/07/Screenshot-2021-11-24-at-13-57-15-Deaville-Introduction-to-the-special-issue-spacesofidentity-net.png 1149w" sizes="auto, (max-width: 300px) 100vw, 300px" title="" /></a><div class="wp-caption-text" id="caption-attachment-257">Figure 1: a screenshot of the error message that prevents some submissions from being re-published or having new versions published.</div></div> <p>To resolve this error, you must assign an Editor to the submission and reapprove the submission for publication:</p> <ol><li>Review the status of the Workflow sub-tabs: <ol style="list-style-type: lower-roman"><li>In Submission sub-tab, the square above Participants should say “Assign an editor to enable the editorial decisions for this stage.” There should be no Editor listed in the Participants area (Figure 2)<br /> <div class="wp-caption aligncenter" id="attachment_258" aria-describedby="caption-attachment-258" style="width: 300px"><a href="https://pressbooks.library.yorku.ca/ojsforydj/wp-content/uploads/sites/94/2021/07/Screenshot-2021-11-24-at-13-51-17-Deaville-Introduction-to-the-special-issue-spacesofidentity-net.png" data-url="https://pressbooks.library.yorku.ca/ojsforydj/wp-content/uploads/sites/94/2021/07/Screenshot-2021-11-24-at-13-51-17-Deaville-Introduction-to-the-special-issue-spacesofidentity-net.png"><img src="https://pressbooks.library.yorku.ca/ojsforydj/wp-content/uploads/sites/94/2021/07/Screenshot-2021-11-24-at-13-51-17-Deaville-Introduction-to-the-special-issue-spacesofidentity-net-300x230.png" alt="The Submission sub-tab says: Assign an editor to enable the editorial decisions for this stage." class="size-medium wp-image-258" width="300" height="230" srcset="https://pressbooks.library.yorku.ca/ojsforydj/wp-content/uploads/sites/94/2021/07/Screenshot-2021-11-24-at-13-51-17-Deaville-Introduction-to-the-special-issue-spacesofidentity-net-300x230.png 300w, https://pressbooks.library.yorku.ca/ojsforydj/wp-content/uploads/sites/94/2021/07/Screenshot-2021-11-24-at-13-51-17-Deaville-Introduction-to-the-special-issue-spacesofidentity-net-1024x784.png 1024w, https://pressbooks.library.yorku.ca/ojsforydj/wp-content/uploads/sites/94/2021/07/Screenshot-2021-11-24-at-13-51-17-Deaville-Introduction-to-the-special-issue-spacesofidentity-net-768x588.png 768w, https://pressbooks.library.yorku.ca/ojsforydj/wp-content/uploads/sites/94/2021/07/Screenshot-2021-11-24-at-13-51-17-Deaville-Introduction-to-the-special-issue-spacesofidentity-net-65x50.png 65w, https://pressbooks.library.yorku.ca/ojsforydj/wp-content/uploads/sites/94/2021/07/Screenshot-2021-11-24-at-13-51-17-Deaville-Introduction-to-the-special-issue-spacesofidentity-net-225x172.png 225w, https://pressbooks.library.yorku.ca/ojsforydj/wp-content/uploads/sites/94/2021/07/Screenshot-2021-11-24-at-13-51-17-Deaville-Introduction-to-the-special-issue-spacesofidentity-net-350x268.png 350w, https://pressbooks.library.yorku.ca/ojsforydj/wp-content/uploads/sites/94/2021/07/Screenshot-2021-11-24-at-13-51-17-Deaville-Introduction-to-the-special-issue-spacesofidentity-net.png 1149w" sizes="auto, (max-width: 300px) 100vw, 300px" title="" /></a><div class="wp-caption-text" id="caption-attachment-258">Figure 2: the Submission sub-tab shows that there is no Editor for this Submission</div></div> </li> <li>The Review sub-tab should say “The review process has not yet been initiated” (Figure 3)<br /> <div class="wp-caption aligncenter" id="attachment_265" aria-describedby="caption-attachment-265" style="width: 300px"><a href="https://pressbooks.library.yorku.ca/ojsforydj/wp-content/uploads/sites/94/2021/07/Screenshot-2021-11-24-at-13-51-31-Deaville-Introduction-to-the-special-issue-spacesofidentity-net.png" data-url="https://pressbooks.library.yorku.ca/ojsforydj/wp-content/uploads/sites/94/2021/07/Screenshot-2021-11-24-at-13-51-31-Deaville-Introduction-to-the-special-issue-spacesofidentity-net.png"><img src="https://pressbooks.library.yorku.ca/ojsforydj/wp-content/uploads/sites/94/2021/07/Screenshot-2021-11-24-at-13-51-31-Deaville-Introduction-to-the-special-issue-spacesofidentity-net-300x230.png" alt="The Review sub-tab says: The review process has not yet been initiated." class="size-medium wp-image-265" width="300" height="230" srcset="https://pressbooks.library.yorku.ca/ojsforydj/wp-content/uploads/sites/94/2021/07/Screenshot-2021-11-24-at-13-51-31-Deaville-Introduction-to-the-special-issue-spacesofidentity-net-300x230.png 300w, https://pressbooks.library.yorku.ca/ojsforydj/wp-content/uploads/sites/94/2021/07/Screenshot-2021-11-24-at-13-51-31-Deaville-Introduction-to-the-special-issue-spacesofidentity-net-1024x784.png 1024w, https://pressbooks.library.yorku.ca/ojsforydj/wp-content/uploads/sites/94/2021/07/Screenshot-2021-11-24-at-13-51-31-Deaville-Introduction-to-the-special-issue-spacesofidentity-net-768x588.png 768w, https://pressbooks.library.yorku.ca/ojsforydj/wp-content/uploads/sites/94/2021/07/Screenshot-2021-11-24-at-13-51-31-Deaville-Introduction-to-the-special-issue-spacesofidentity-net-65x50.png 65w, https://pressbooks.library.yorku.ca/ojsforydj/wp-content/uploads/sites/94/2021/07/Screenshot-2021-11-24-at-13-51-31-Deaville-Introduction-to-the-special-issue-spacesofidentity-net-225x172.png 225w, https://pressbooks.library.yorku.ca/ojsforydj/wp-content/uploads/sites/94/2021/07/Screenshot-2021-11-24-at-13-51-31-Deaville-Introduction-to-the-special-issue-spacesofidentity-net-350x268.png 350w, https://pressbooks.library.yorku.ca/ojsforydj/wp-content/uploads/sites/94/2021/07/Screenshot-2021-11-24-at-13-51-31-Deaville-Introduction-to-the-special-issue-spacesofidentity-net.png 1149w" sizes="auto, (max-width: 300px) 100vw, 300px" title="" /></a><div class="wp-caption-text" id="caption-attachment-265">Figure 3: the Review sub-tab shows that the Review stage has not yet been initiated.</div></div> </li> </ol> </li> <li>Assign the Editor to the submission: <ol style="list-style-type: lower-roman"><li>In the Submission sub-tab, next to Participants click <strong>Assign</strong></li> <li>In the Assign Participant window that pops up, set the drop-down menu under <strong>Locate Role</strong> to the appropriate editorial role for your account</li> <li>In the list of names, select your user account</li> <li>Ensure the predefined message template and Message fields are blank</li> <li>Click <strong>OK</strong>.</li> </ol> </li> <li>Update the decision: <ol style="list-style-type: lower-roman"><li>In the Submission sub-tab, click <strong>Change decision</strong></li> <li>Click <strong>Accept and Skip Review</strong></li> <li>In the Accept and Skip Review window that pops up, select <strong>“Do not send an email notification”</strong></li> <li>Click <strong>Next: Select Files for Copyediting</strong></li> <li>Click <strong>Record Editorial Decision</strong>. The page should reload at the Copyediting sub-tab.</li> </ol> </li> </ol> <p>You should now be able to republish or publish a new version of the submission.</p> 
	</div>


	</div>
<div class="chapter standard with-subsections" id="chapter-adding-data-sets-to-articles" title="Adding data sets to articles">
	<div class="chapter-title-wrap">
		<p class="chapter-number">15</p>
		<h1 class="chapter-title">Adding data sets to articles</h1>
								</div>
	<div class="ugc chapter-ugc">
				 <div class="textbox shaded"><strong>Last updated:</strong> July 29 for OJS 3.3</div> <p>To upload a data set to OJS and make it available alongside the galley:</p> <ol><li>Go to submission’s <strong>Production</strong> tab and click <strong>Galleys.</strong></li> <li>Click <strong>Add Galley</strong>.</li> <li>In the Create New Galley window, enter the file format under <strong>Galley Label</strong>. You may wish to add a descriptive title in parentheses, eg, “CSV (data set).”</li> <li>Click <strong>Save</strong>.</li> <li>Select the “Data Set” in the <strong>Article Component</strong>.</li> <li>Upload the data set by dragging and dropping the file or clicking <strong>Upload File<em>.</em></strong></li> <li>Click <strong>Continue.</strong></li> <li>Edit the <strong>Name the</strong> file field, if necessary.</li> <li>Click <strong>Continue</strong>.</li> <li>Click <strong>Complete</strong>.</li> </ol> <p>Once published, a link to the data set will appear on the submission’s metadata page (see Figure 1).</p> <div class="wp-caption aligncenter" id="attachment_69" aria-describedby="caption-attachment-69" style="width: 300px"><a href="https://pressbooks.library.yorku.ca/ojsforydj/wp-content/uploads/sites/94/2021/07/data-set-galley.jpg" data-url="https://pressbooks.library.yorku.ca/ojsforydj/wp-content/uploads/sites/94/2021/07/data-set-galley.jpg"><img src="https://pressbooks.library.yorku.ca/ojsforydj/wp-content/uploads/sites/94/2021/07/data-set-galley-300x258.jpg" alt="An article&amp;#039;s metadata page showing the link to the data set file" class="size-medium wp-image-69" width="300" height="258" srcset="https://pressbooks.library.yorku.ca/ojsforydj/wp-content/uploads/sites/94/2021/07/data-set-galley-300x258.jpg 300w, https://pressbooks.library.yorku.ca/ojsforydj/wp-content/uploads/sites/94/2021/07/data-set-galley-65x56.jpg 65w, https://pressbooks.library.yorku.ca/ojsforydj/wp-content/uploads/sites/94/2021/07/data-set-galley-225x193.jpg 225w, https://pressbooks.library.yorku.ca/ojsforydj/wp-content/uploads/sites/94/2021/07/data-set-galley-350x300.jpg 350w, https://pressbooks.library.yorku.ca/ojsforydj/wp-content/uploads/sites/94/2021/07/data-set-galley.jpg 692w" sizes="auto, (max-width: 300px) 100vw, 300px" title="" /></a><div class="wp-caption-text" id="caption-attachment-69">Figure 1: Once published, a link to the uploaded data set will appear below the link to the Article Text galley.</div></div> <p>If the data set is hosted in an external repository such as <a href="https://dataverse.scholarsportal.info/dataverse/york" data-url="https://dataverse.scholarsportal.info/dataverse/york">York University Dataverse</a>, it is possible to link to the external site instead of republishing the data set in OJS. To link to an external data set:</p> <ol><li>Follow steps 1-3 in the list above.</li> <li>Check the box labelled <strong>This galley will be available at a separate website</strong>.</li> <li>Enter the URL of the data set.</li> <li>Click <strong>Save</strong>.</li> </ol> <p>Once published, a link to the data set will appear on the submission’s metadata page (see Figure 2).</p> <div class="wp-caption aligncenter" id="attachment_70" aria-describedby="caption-attachment-70" style="width: 300px"><a href="https://pressbooks.library.yorku.ca/ojsforydj/wp-content/uploads/sites/94/2021/07/external-data-galley.jpg" data-url="https://pressbooks.library.yorku.ca/ojsforydj/wp-content/uploads/sites/94/2021/07/external-data-galley.jpg"><img src="https://pressbooks.library.yorku.ca/ojsforydj/wp-content/uploads/sites/94/2021/07/external-data-galley-300x215.jpg" alt="Article metadata page showing a link to the external data set" class="size-medium wp-image-70" width="300" height="215" srcset="https://pressbooks.library.yorku.ca/ojsforydj/wp-content/uploads/sites/94/2021/07/external-data-galley-300x215.jpg 300w, https://pressbooks.library.yorku.ca/ojsforydj/wp-content/uploads/sites/94/2021/07/external-data-galley-65x47.jpg 65w, https://pressbooks.library.yorku.ca/ojsforydj/wp-content/uploads/sites/94/2021/07/external-data-galley-225x161.jpg 225w, https://pressbooks.library.yorku.ca/ojsforydj/wp-content/uploads/sites/94/2021/07/external-data-galley-350x251.jpg 350w, https://pressbooks.library.yorku.ca/ojsforydj/wp-content/uploads/sites/94/2021/07/external-data-galley.jpg 662w" sizes="auto, (max-width: 300px) 100vw, 300px" title="" /></a><div class="wp-caption-text" id="caption-attachment-70">Figure 2: Once published, a link to the external data set will appear next to the link to the Article Text galley.</div></div> 
	</div>


	</div>
<div class="chapter standard with-subsections" id="chapter-adding-dois-to-article-galleys-before-publication" title="Adding DOIs to submission galleys before publication">
	<div class="chapter-title-wrap">
		<p class="chapter-number">16</p>
		<h1 class="chapter-title">Adding DOIs to submission galleys before publication</h1>
								</div>
	<div class="ugc chapter-ugc">
				 <div class="textbox shaded"><strong>Last updated:</strong> November 19 for OJS 3.3</div> <p>If your journal has been configured for DOIs, you can easily determine what the DOI will be before you publish it. This way, you can add the DOI to the <span class="glossary-term">galley</span> even though it is not possible to view the DOI before publication.</p> <p>See the chapter on the <a href="#chapter-determining-the-structure-of-your-dois" data-url="https://pressbooks.library.yorku.ca/ojsforydj/chapter/determining-the-structure-of-your-dois/">structure of DOIs</a> to determine what a <span class="glossary-term">submission's</span> DOI will be and to transform the DOI into a URL. Once you have determined the DOI and transformed it into a URL, you can add the DOI to the galley as a link that will go live once the submission is published.</p> 
	</div>


	</div>
<div class="chapter standard with-subsections" id="chapter-category" title="Understanding and using Categories">
	<div class="chapter-title-wrap">
		<p class="chapter-number">17</p>
		<h1 class="chapter-title">Understanding and using Categories</h1>
								</div>
	<div class="ugc chapter-ugc">
				 <div class="textbox shaded"><p><strong>Last updated</strong>: May 2, 2025 for OJS 3.3 and 3.4</p> </div> <div data-olk-copy-source="MessageBody">The Category feature is best used as a browsing tool for readers that is distinct from Issues and Sections. It should be used in conjunction with the Browse Block or with navigation menu items.</div> <div data-olk-copy-source="MessageBody"></div> <div data-olk-copy-source="MessageBody">When you create a Category, you do two things:</div> <ol><li data-olk-copy-source="MessageBody">You create a page for that Category, which includes a list of all articles assigned to it, as well as an optional description and cover image. (Example: <a href="https://jat.journals.yorku.ca/index.php/default/catalog/category/parent1" data-url="https://jat.journals.yorku.ca/index.php/default/catalog/category/parent1">Category browse page</a>)</li> <li data-olk-copy-source="MessageBody">You add a field to the submission’s metadata page, which links to the Category page. (Example: <a href="https://jat.journals.yorku.ca/index.php/default/article/view/97" data-url="https://jat.journals.yorku.ca/index.php/default/article/view/97">submission metadata page</a>)</li> </ol> <p>You can also nest Categories one level using Parent Category. Both the Parent Category and the nested Category will receive their own pages. The Parent Category page will link both to the submissions assigned to it and to the pages for the nested Categories.</p> <p>Unlike sections, Categories do not appear in an issue’s table of contents and cannot be used to direct submissions to a particular editor. However, Categories can be used to make related content from across multiple issues in the same place. If you wish to make your journal content browsable by section, please request that the Digital Publishing Librarian install the Browse By Section Plugin.</p> <h2>Creating Categories</h2> <div data-olk-copy-source="MessageBody">Create and edit Categories at <strong>Journal Settings &gt; Categories</strong>.</div> <h2>Assigning submissions to Categories</h2> <p>If your journal has created any Categories, they will appear in the submission process for authors as well as in the QuickSubmit form. You can also edit the Category assignment in a submission’s <strong>Publication &gt; Issue</strong> tab.</p> <h2>Making Categories discoverable</h2> <div data-olk-copy-source="MessageBody">Categories should be used in conjunction with the Browse Block, which can be activated at <strong>Website Settings &gt; Appearance &gt; Setup &gt; Sidebar</strong>. This sidebar block will automatically update as Categories are added, removed, or nested.</div> <div data-olk-copy-source="MessageBody"></div> <div data-olk-copy-source="MessageBody">You may also also wish to manually create <a href="#appearance_navigation" data-url="https://pressbooks.library.yorku.ca/ojsforydj/chapter/managing-appearance/#appearance_navigation">Navigation Menu Items</a> for your Categories. However, these will not automatically update as Categories are added, removed, or nested.</div> 
	</div>


	</div>

</div>
<div class="part-wrapper" id="part-issues-wrapper">
    <div class="part  " id="part-issues">
	<div class="part-title-wrap">
		<p class="part-number">III</p>
		<h1 class="part-title">Issues</h1>
	</div>
	<div class="ugc part-ugc">
		<div class="textbox shaded"><strong>Last updated:</strong> September 29, 2021</div> <p>The <span class="glossary-term">issue</span> is one of the key elements of OJS. All content must be assigned to an issue in order to be published.</p> <p>Even if you wish to use a continuous publication model in where you publish new submissions as soon as they are ready, you must assign the submissions to a published issue.</p>
	</div>
			
				
	</div>
<div class="chapter standard with-subsections" id="chapter-creating-an-issue" title="Creating an issue">
	<div class="chapter-title-wrap">
		<p class="chapter-number">18</p>
		<h1 class="chapter-title">Creating an issue</h1>
								</div>
	<div class="ugc chapter-ugc">
				 <div class="textbox shaded"><strong>Last updated:</strong> July 26, 2021 for OJS 3.3</div> <ol><li>Click <strong>Issue</strong> &gt; <strong>Future Issues</strong> &gt; <strong>Create Issue</strong></li> <li>Enter the <strong>Volume, Number, Year</strong>, and <strong>Title </strong>information, as applicable to your journal <ol style="list-style-type: lower-roman"><li>Follow the conventions previous established to identify each issue.</li> <li>Use the checkboxes to select which of these 4 elements will be used to identify the issue in the issue title and in the list of issues in the Archive.</li> </ol> </li> <li>Add a <strong>Description </strong>and upload a <strong>Cover image </strong>if desired <ol style="list-style-type: lower-roman"><li>The Description will appear ahead of the Table of Contents for the issue and in the list of back issues in the Archives on the front end.</li> </ol> </li> <li>Click <strong>Save</strong>. </li> </ol> <p>You can now assign articles to the issue, but it will not be published yet.</p> 
	</div>


	</div>
<div class="chapter standard with-subsections" id="chapter-publishing-an-issue" title="Publishing an issue">
	<div class="chapter-title-wrap">
		<p class="chapter-number">19</p>
		<h1 class="chapter-title">Publishing an issue</h1>
								</div>
	<div class="ugc chapter-ugc">
				 <div class="textbox shaded"><strong>Last updated:</strong> July 26, 2021 for OJS 3.3</div> <ol><li>Click <strong>Issue</strong> &gt; <strong>Future Issues</strong></li> <li>Click the small triangle to the left title of the issue you want to publish. You will now see several buttons below the title.</li> <li>Click <strong>Publish Issue</strong>.</li> </ol> 
	</div>


	</div>
<div class="chapter standard with-subsections" id="chapter-reordering-the-issue-table-of-contents" title="Reordering the issue Table of Contents">
	<div class="chapter-title-wrap">
		<p class="chapter-number">20</p>
		<h1 class="chapter-title">Reordering the issue Table of Contents</h1>
								</div>
	<div class="ugc chapter-ugc">
				 <div class="textbox shaded"><strong>Last updated:</strong> July 26, 2021 for OJS 3.3</div> <ol><li>Click <strong>Issue</strong> &gt; <strong>Back Issues</strong> &gt; <strong>[issue]</strong><em>.</em> This will show you the details about the issue, opening on the Table of Contents Tab</li> <li>Click <strong>Order</strong></li> <li>Drag and drop the articles into the correct order then click <strong>Done</strong>.</li> </ol> 
	</div>


	</div>
<div class="chapter standard with-subsections" id="chapter-setting-your-current-issue" title="Setting your Current Issue">
	<div class="chapter-title-wrap">
		<p class="chapter-number">21</p>
		<h1 class="chapter-title">Setting your Current Issue</h1>
								</div>
	<div class="ugc chapter-ugc">
				 <div class="textbox shaded"><strong>Last updated:</strong> February 17, 2026 for OJS 3.3</div> <p>Your Current Issue is that <span class="glossary-term">issue</span> that:</p> <ul><li>displays on the journal’s homepage, and</li> <li>is linked to from the <strong>Current </strong>item in the main navigation menu.</li> </ul> <p>By default, your Current Issue is the most recently published issue. However, you may need to designate another issue as the Current Issue</p> <p><em>Note:</em> if you unpublish your Current Issue, no issue will be designated as Current and you will have to manually reassign it.</p> <p>To manually set your current issue:</p> <ol><li>In the back end, navigate to the <strong>Back Issues</strong> tab of the Issues page</li> <li>Click the blue arrow to the left of the issue you wish to make your Current Issue</li> <li>Click <strong>Current Issue </strong>under the name of the issue. <em>Note</em>: if you don’t see the Current Issue button, that means the issue is already designated as Current Issue.</li> <li>In the dialogue window, click <strong>OK</strong>.</li> </ol> 
	</div>


	</div>
<div class="chapter standard with-subsections" id="chapter-changing-the-order-of-issues-in-your-archive" title="Changing the order of issues in your Archive">
	<div class="chapter-title-wrap">
		<p class="chapter-number">22</p>
		<h1 class="chapter-title">Changing the order of issues in your Archive</h1>
								</div>
	<div class="ugc chapter-ugc">
				 <div class="textbox shaded"><strong>Last updated:</strong> July 20, 2020 for OJS 3.3.0.11</div> <ol><li>Click <strong>Issue</strong> &gt; <strong>Back Issues</strong></li> <li>Click <strong>Order</strong></li> <li>Drag and drop the issues into the correct order then click <strong>Done</strong>.</li> </ol> <p>The issue at the top of the list of issues does not automatically become your <span class="glossary-term">Current Issue</span>. If required, you should <a href="#chapter-setting-your-current-issue" data-url="https://pressbooks.library.yorku.ca/ojsforydj/chapter/setting-your-current-issue/">update your Current Issue</a> after changing the order.</p> 
	</div>


	</div>
<div class="chapter standard with-subsections" id="chapter-issue-galley" title="Adding a full-issue PDF galley">
	<div class="chapter-title-wrap">
		<p class="chapter-number">23</p>
		<h1 class="chapter-title">Adding a full-issue PDF galley</h1>
								</div>
	<div class="ugc chapter-ugc">
				 <div class="textbox shaded"><p><strong>Last updated:</strong> July 28, 2025 for OJS 3.3 and 3.4</p> </div> <p>Never upload a PDF of your full issue as a submission. Instead, upload it as an&nbsp;<em>issue galley</em>.</p> <p>To upload an issue galley:</p> <ol><li>In the back end, go to <strong>Issues</strong></li> <li>If the issue has not been published yet, stay on the <strong>Future Issues</strong> view; if it has already been published, click <strong>Back Issues</strong></li> <li>Click the title of the issue to open the Issue Management window</li> <li>Click the <strong>Issue Galleys</strong> tab</li> <li>Click <strong>Create Issue Galley</strong></li> <li>Upload the issue galley by clicking <strong>Upload File</strong> or by dragging and dropping the file from your desktop</li> <li>Under <strong>Galley Label</strong>, add the file format – usually, this will be “PDF”</li> <li>Select the <strong>Language</strong> of the issue. If multiple languages, choose the one that appears most often. You may also create multiple issue galleys if you have them in multiple languages.</li> <li>Click <strong>Save</strong>.</li> </ol> 
	</div>


	</div>

</div>
<div class="part-wrapper" id="part-dois-wrapper">
    <div class="part  " id="part-dois">
	<div class="part-title-wrap">
		<p class="part-number">IV</p>
		<h1 class="part-title">Digital Object Identifiers (DOI)</h1>
	</div>
	<div class="ugc part-ugc">
		<div class="textbox shaded"><strong>Last updated:</strong> November 19, 2021</div> <p><a href="https://www.doi.org/" data-url="https://www.doi.org/">Digital Object Identifiers</a> (DOIs) may be available for your journal. Please contact your Digital Publishing Librarian to find out if your journal is eligible.</p> <p>YDJ registers DOIs through York University Libraries’ <a href="https://www.crossref.org/" data-url="https://www.crossref.org/">CrossRef</a> membership. Our membership specifies that we are obligated to publish <a href="https://www.crossref.org/services/reference-linking/" data-url="https://www.crossref.org/services/reference-linking/">reference lists</a> for submissions which receive DOIs. This section includes a chapter on <a href="#chapter-reference-lists" data-url="https://pressbooks.library.yorku.ca/ojsforydj/chapter/reference-lists/">how to upload and publish reference lists</a>.</p>
	</div>
			
				
	</div>
<div class="chapter standard with-subsections" id="chapter-determining-the-structure-of-your-dois" title="Determining the structure of your DOIs">
	<div class="chapter-title-wrap">
		<p class="chapter-number">24</p>
		<h1 class="chapter-title">Determining the structure of your DOIs</h1>
								</div>
	<div class="ugc chapter-ugc">
				 <p>This chapter explains the syntax of a DOI, how to determine the submission ID (a part of the DOI syntax), and how transform the DOI into a URL.</p> <h2>DOI syntax</h2> <p>There are two parts to a DOI: a prefix and a suffix, separated by a slash<span class="footnote"><span class="footnote-indirect" data-fnref="235-1"></span></span>.</p> <p>The prefix for all YDJ DOIs is “10.25071.”</p> <p>The suffix for all YDJ DOIs is:</p> <ul><li>the ISSN of the journal</li> <li>a period</li> <li>the OJS submission ID.</li> </ul> <p>For example, 10.25071/1920-7336.40655 is the DOI of a YDJ article. “1920-7336” is the ISSN of the journal and “40655” is the submission ID assigned by OJS.</p> <p>OJS assigns every submission a unique, numeric ID as soon as it is created. By using the ISSN in combination with the submission ID, we ensure that there is no duplication of DOIs across journals or within the same journal.</p> <h2>How to determine the submission ID</h2> <p>You can determine the submission ID by viewing the submission in the back end of OJS. The submission ID appears in two places (see Figure 1):</p> <ul><li>the portion of the URL following “/index/”</li> <li>the running header of the submission, to the left of the author’s name</li> </ul> <div class="wp-caption aligncenter" id="attachment_61" aria-describedby="caption-attachment-61" style="width: 300px"><a href="https://pressbooks.library.yorku.ca/ojsforydj/wp-content/uploads/sites/94/2021/07/OJS-submission-ID.png" data-url="https://pressbooks.library.yorku.ca/ojsforydj/wp-content/uploads/sites/94/2021/07/OJS-submission-ID.png"><img src="https://pressbooks.library.yorku.ca/ojsforydj/wp-content/uploads/sites/94/2021/07/OJS-submission-ID-300x112.png" alt="The OJS interface showing the location of the submission IDs with red arrows" class="size-medium wp-image-61" width="300" height="112" srcset="https://pressbooks.library.yorku.ca/ojsforydj/wp-content/uploads/sites/94/2021/07/OJS-submission-ID-300x112.png 300w, https://pressbooks.library.yorku.ca/ojsforydj/wp-content/uploads/sites/94/2021/07/OJS-submission-ID-768x287.png 768w, https://pressbooks.library.yorku.ca/ojsforydj/wp-content/uploads/sites/94/2021/07/OJS-submission-ID-65x24.png 65w, https://pressbooks.library.yorku.ca/ojsforydj/wp-content/uploads/sites/94/2021/07/OJS-submission-ID-225x84.png 225w, https://pressbooks.library.yorku.ca/ojsforydj/wp-content/uploads/sites/94/2021/07/OJS-submission-ID-350x131.png 350w, https://pressbooks.library.yorku.ca/ojsforydj/wp-content/uploads/sites/94/2021/07/OJS-submission-ID.png 938w" sizes="auto, (max-width: 300px) 100vw, 300px" title="" /></a><div class="wp-caption-text" id="caption-attachment-61">Figure 1: The location of the submission ID is indicated by the two red arrows. In this case, the submission ID is 40655.</div></div> <p>The submission ID also appears in the URL of the submission once published.</p> <h2>Turning a DOI into a URL</h2> <p>A DOI transforms into a URL by adding “http://doi.org/” at the start of the DOI. This sting is technically not part of the DOI; however, DOIs must be transformed into URLs to be useful to most readers.</p> <p>For example, the URL for the DOI 10.25071/1920-7336.40655 is <a href="http://doi.org/10.25071/1920-7336.40655" data-url="http://doi.org/10.25071/1920-7336.40655">http://doi.org/10.25071/1920-7336.40655</a>.</p> 
	</div>
			
				
				<div class="footnotes"><div id='235-1'>
<p><a href="https://www.doi.org/doi_handbook/2_Numbering.html" data-url="https://www.doi.org/doi_handbook/2_Numbering.html"><em>DOI Handbook</em>. 2: Numbering.</a></p>

</div></div>
	</div>
<div class="chapter standard with-subsections" id="chapter-reference-lists" title="Uploading and publishing reference lists">
	<div class="chapter-title-wrap">
		<p class="chapter-number">25</p>
		<h1 class="chapter-title">Uploading and publishing reference lists</h1>
								</div>
	<div class="ugc chapter-ugc">
				 <div class="textbox shaded"><strong>Last updated: </strong>November 19, 2021 for OJS 3.3.0.8</div> <p>YDJ registers DOIs through York University Libraries’ <a href="https://www.crossref.org/" data-url="https://www.crossref.org/">CrossRef</a> membership. Our membership specifies that we are obligated to <a href="https://www.crossref.org/services/reference-linking/" data-url="https://www.crossref.org/services/reference-linking/">publish reference lists</a> for submissions which receive DOIs. This chapter explains how to publish reference lists with your submissions in order to comply with this requirement.</p> <p>If your journal provides DOIs but does not publish reference lists for new submissions, YDJ may need to cease provision of DOIs for your journal.</p> <h2>Reference list setup</h2> <p>To publish reference lists, you must first make a policy decision and then make a corresponding change to the configuration of OJS.</p> <p>The policy decision is a choice between three alternatives:</p> <ol><li>Are editors solely responsible for uploading reference lists?</li> <li>Are authors <em>requested</em> to upload reference lists with their initial submission? In this case, editors are responsible for uploading reference lists if the author does not.</li> <li>Are authors <em>required</em> to upload reference lists with their initial submission?</li> </ol> <p>If you chose the options 2 or 3, you may wish to update your Submission Checklist and Author Guidelines.</p> <p>Once you have made your policy decision, you must implement this in OJS:</p> <ol><li>Go to <strong>Workflow Settings</strong> &gt; <strong>Submission</strong> &gt; <strong>Metadata</strong></li> <li>Under References, check the box for <strong>Enable references metadata</strong></li> <li>Select the radio button corresponding to your policy choice</li> <li>Click <strong>Save</strong>.</li> </ol> <p>If you chose policy options 2 or 3, the references metadata field will now appear in the regular submission and <a href="#chapter-using-the-quicksubmit-plugin" data-url="https://pressbooks.library.yorku.ca/ojsforydj/chapter/using-the-quicksubmit-plugin/">QuickSubmit</a> interfaces. In all cases, the reference metadata field will now appear in the Metadata facet of the submissions Production tab.</p> <h2>Reference list format</h2> <p>The reference lists are style-agnostic. This means the reference lists can be uploaded in any citation agnostic.</p> <p>Each reference in the list should start on a new line.</p> <p><strong>Recommended</strong>: we recommend that you or your authors remove all DOIs from the reference lists prior to publication. The CrossRef Reference Linking Plugin, which the Digital Publishing Librarian will configure when setting you up for DOIs, will automatically search for and include DOI links for any reference in the list with a DOI. If there are already DOIs in the reference list, those references may display 2 DOI links.</p> <h2>Publishing the reference lists</h2> <p>The reference lists are published with the submission metadata as soon as the submission is published. The editors only need to get involved if the authors do not provide the reference lists themselves.</p> 
	</div>


	</div>
<div class="chapter standard with-subsections" id="chapter-manual-dois" title="Creating and registering DOIs">
	<div class="chapter-title-wrap">
		<p class="chapter-number">26</p>
		<h1 class="chapter-title">Creating and registering DOIs</h1>
								</div>
	<div class="ugc chapter-ugc">
				 <div class="textbox shaded"><strong>Last updated: </strong>June 4, 2025 for OJS 3.3.0.19</div> <div><div class="textbox shaded"><p><strong>Note regarding OJS 3.4+:</strong> the DOI creation mechanism was overhauled in OJS 3.4 and the workflow described on this page does not apply. Please see <a href="https://docs.pkp.sfu.ca/learning-ojs/en/settings-distribution#dois" data-url="https://docs.pkp.sfu.ca/learning-ojs/en/settings-distribution#dois">the section on DOIs</a> from Learning OJS 3.4 (PKP).</p> </div> </div> <p>There are two steps to adding DOIs to your submissions:</p> <ol><li><a href="#manual-DOI" data-url="https://pressbooks.library.yorku.ca/ojsforydj/chapter/manual-dois/#manual-DOI">Creating DOIs</a> (also called “minting”): creating and assigning a unique DOI for the submission, which includes the DOI prefix for YUL and the unique string to identify the submission.</li> <li><a href="#register-DOI" data-url="https://pressbooks.library.yorku.ca/ojsforydj/chapter/manual-dois/#register-DOI">Registering DOIs</a>: registering DOI with Crossref (the registration agency with whom YUL is partnered) is required to make DOI links behave like DOIs and redirect to the OJS page for the submission.</li> </ol> <p>In most cases, you will create DOIs manually and DOIs will register automatically; however, in some cases you will need to register DOIs manually.</p> <table class="grid alignleft" style="border-collapse: collapse;width: 100%;height: 45px"><caption>How to create and register DOIs according to publication model</caption> <thead><tr style="height: 15px"><th style="width: 33.3333%;height: 15px">Publication model</th> <th style="width: 33.3333%;height: 15px">Creating DOIs</th> <th style="width: 33.3333%;height: 15px">Registering DOIs</th> </tr> </thead> <tbody><tr style="height: 15px"><td style="width: 33.3333%;height: 15px">Standard publication: new submissions are published for the first time via a new issue</td> <td style="width: 33.3333%;height: 15px">Manual</td> <td style="width: 33.3333%;height: 15px">Automatic</td> </tr> <tr style="height: 15px"><td style="width: 33.3333%;height: 15px">Online First/Forthcoming publication or rolling publication: new submissions are published for the first time after the issue is published</td> <td style="width: 33.3333%;height: 15px">Manual</td> <td style="width: 33.3333%;height: 15px">Manual</td> </tr> </tbody> </table> <h2></h2> <p>In rare cases, you may need to <a href="#bulk-DOI" data-url="https://pressbooks.library.yorku.ca/ojsforydj/chapter/manual-dois/#bulk-DOI">create DOIs in bulk</a>. In OJS 3.3, this can only be done after publication.</p> <h2><a id="manual-DOI" data-url=""></a>Creating DOIs</h2> <p>In most cases you create DOIs for each submission manually when preparing for publication. Using this method, you should create the DOI to the submission <em>before</em> publishing it; otherwise you will need to <a href="#chapter-editing-after-publication" data-url="https://pressbooks.library.yorku.ca/ojsforydj/chapter/editing-after-publication/">edit each submission after publishing</a> unless you use the bulk method described below.</p> <p>To manually create a DOI for a submission:</p> <ol><li>In the back end of OJS, go to the submission’s <strong>Publication</strong> tab</li> <li>Click the <strong>Identifiers</strong> tab</li> <li>On the Identifiers tab, you should see the heading DOI with a blank text input field below it and a button labeled Assign. Click <strong>Assign</strong>.</li> <li>When you click Assign, a DOI will appear in the input field. Click <strong>Save</strong> to finish.</li> </ol> <p>Once the submission is published, the DOI must be <a href="#register-DOI" data-url="https://pressbooks.library.yorku.ca/ojsforydj/chapter/manual-dois/#register-DOI">registered</a>.</p> <h3>Optional: creating DOIs in bulk</h3> <p>If you create DOIs to multiple submissions after publication, you can use the bulk method. In OJS 3.3, this can only be done <em>after</em> publishing the submissions.</p> <p>To create DOIs in bulk:</p> <ol><li>In the back end of OJS, click <strong>Tools</strong> near the bottom of the left sidebar</li> <li>In the list of tools, click <strong>CrossRef XML Export Plugin</strong></li> <li>In the Settings tab of the CrossRef XML Export Plugin, click <strong>DOI Plugin Settings</strong></li> <li>In the DOI Plugin Settings window, click <strong>Assign DOIs. </strong>The page will appear to be loading for several moments once you do this</li> <li>Click <strong>Save</strong>. You will now return to the CrossRef XML Export Plugin page.</li> <li>Follow the instructions for Registering DOIs manually, below.</li> </ol> <p>After you create DOIs in bulk, you must <a href="#manual-registration" data-url="https://pressbooks.library.yorku.ca/ojsforydj/chapter/manual-dois/#manual-registration">register them manually</a> (described below).</p> <h2><a id="register-DOI" data-url=""></a>Registering DOIs</h2> <p>Once you have created&nbsp; the DOIs, you must register them to ensure that they function as DOIs. This allows the DOI URL to redirect to the publication page, and allows Crossref to track citations.</p> <h3>Automatic DOI registration</h3> <p>If your journal uses the standard, basic form of publication (submissions are published for the first time when a new issue is published), the DOIs should automatically be registered once a new issue is published.</p> <p>However, sometimes the DOIs don’t register automatically for unknown reasons; if this happens, you will need to register the DOIs manually. Note: DOI registration takes some time to complete; please wait up to an hour before checking to see if the DOIs have registered.</p> <h3><a id="manual-registration" data-url=""></a>Manual DOI registration</h3> <p>If your journal uses an Online First/Forthcoming or a rolling publication model, or if the DOIs do not register manually, you will need to <em>create and assign</em>&nbsp;and&nbsp;<em>register</em>&nbsp;the DOIs manually.</p> <p>To register DOIs manually:</p> <ol><li style="list-style-type: none"><ol><li>In the back end of OJS, click <strong>Tools</strong> near the bottom of the left sidebar</li> <li>In the list of tools, click <strong>CrossRef XML Export Plugin</strong></li> <li>On the plugin page, click the <strong>Articles</strong> tab. If your journal has a large number of articles, it may take some time to load</li> <li>In the Articles tab, click <strong>Search</strong>. This will show several new drop-down menus above the list of articles</li> <li>Select that drop-down menu that says <strong>Any Status</strong> and change it to <strong>Not Deposited</strong></li> <li>Click <strong>Search</strong>. You should now see a list only of published submissions that have DOIs assigned but are not registered</li> <li>Check the boxes for each submission you wish to register in the Select column</li> <li>Click <strong>Deposit</strong></li> </ol> </li> </ol> <p>If you received any error messages that you cannot understand and address, please contact the Digital Publishing Librarian for assistance.</p> 
	</div>


	</div>
<div class="chapter standard with-subsections" id="chapter-dois-and-quicksubmit" title="DOIs and QuickSubmit">
	<div class="chapter-title-wrap">
		<p class="chapter-number">27</p>
		<h1 class="chapter-title">DOIs and QuickSubmit</h1>
								</div>
	<div class="ugc chapter-ugc">
				 <div class="textbox shaded"><p><strong>Last updated:</strong> July 28, 2025 for OJS 3.3.0.19</p> </div> <p>After you add submissions to a future issue through <a href="#chapter-using-the-quicksubmit-plugin" data-url="https://pressbooks.library.yorku.ca/ojsforydj/chapter/using-the-quicksubmit-plugin/">QuickSubmit</a>, you should manually assign the DOIs for each article before publishing the issue.</p> <p>To find the submissions and assign DOIs:</p> <ol><li>In the back end, go to <strong>Issues &gt; Future Issues</strong></li> <li>Click the title of the issue to view the assigned submissions</li> <li>In the table of contents, click the blue triangle to the left of the submission title to see the additional options</li> <li>Click <strong>Submission</strong> to see the submission workflow and publication metadata</li> <li>Click <strong>Publication</strong> to open the publication tab</li> <li>Click <strong>Identifiers</strong></li> <li>Under the DOI heading, click <strong>Assign</strong> next to the blank text box. The predetermined DOI will appear in the text box</li> <li>Click Save</li> <li>Repeat steps 3-8 for all submissions assigned to the issue.</li> </ol> <p>The DOIs will register automatically upon publication of the issue.</p> 
	</div>


	</div>

</div>
<div class="part-wrapper" id="part-alternative-publication-models-wrapper">
    <div class="part  " id="part-alternative-publication-models">
	<div class="part-title-wrap">
		<p class="part-number">V</p>
		<h1 class="part-title">Alternative publication models</h1>
	</div>
	<div class="ugc part-ugc">
		<div class="textbox shaded"><strong>Last updated:</strong> November 18, 2021 for OJS 3.3.0.8</div> <p>There are two common alternatives to the regular, full issue publication model: online first, and rolling.</p> <p>In the <strong>online first</strong> publication model (also called “forthcoming”), you publish each <span class="glossary-term">submission</span> as soon as it is ready. Later, you assign these submissions to a regular, numbered <span class="glossary-term">issue</span> – often with additional contents such as reviews, editorial, etc. You can <a href="#chapter-publishing-articles-in-advance-of-full-issue-publication" data-url="https://pressbooks.library.yorku.ca/ojsforydj/chapter/publishing-articles-in-advance-of-full-issue-publication/">use an online first model</a> in OJS but this requires several added steps.</p> <p>In the <strong>rolling publication</strong> model (also called “continuous publication”), you <a href="#chapter-creating-an-issue" data-url="https://pressbooks.library.yorku.ca/ojsforydj/chapter/creating-an-issue/">create</a> and “open” a new, regular issue by <a href="#chapter-publishing-an-issue" data-url="https://pressbooks.library.yorku.ca/ojsforydj/chapter/publishing-an-issue/">publishing it</a> at the beginning of a publication cycle – often, the calendar year. You then add each new submission to the issue as soon it is ready. At the end of the cycle, you “close” the issue and open a new one. To close an issue, just stop adding submissions.</p> <p>The key distinction between this models is these:</p> <ul><li>with an online first model, you “move” submissions from the online first collection to a regular, numbered issue at a certain point;</li> <li>with a rolling publication schedule, the articles stay assigned to the same issue.</li> </ul> <p>In both cases, the URLs for the submissions stay the same once published in OJS.</p> <p>Online first and rolling publication both introduce two small complications for OJS:</p> <ol><li><strong>DOIs.</strong> Normally, OJS assigns and registers DOIs for submissions when a new issue is published. However, in both of the models, issues are published before the articles. That means you have to <a href="#chapter-adding-dois-rolling-publication" data-url="https://pressbooks.library.yorku.ca/ojsforydj/chapter/adding-dois-rolling-publication/">manually assign and register DOIs</a> for submissions.</li> <li><strong>Notifications</strong>. OJS gives you the option of notifying your journal’s regular users about the publication of a new issue. Because the submissions are published separately from the issues, you cannot notify your users about the publication of new submissions. You may wish to use the Announcements plugin in order to send notifications about newly published submissions.</li> </ol>
	</div>
			
				
	</div>
<div class="chapter standard with-subsections" id="chapter-publishing-articles-in-advance-of-full-issue-publication" title="Publishing submissions in advance of regular issues: &quot;online first&quot; or &quot;Forthcoming&quot;">
	<div class="chapter-title-wrap">
		<p class="chapter-number">28</p>
		<h1 class="chapter-title">Publishing submissions in advance of regular issues: &quot;online first&quot; or &quot;Forthcoming&quot;</h1>
								</div>
	<div class="ugc chapter-ugc">
				 <div class="textbox shaded"><strong>Last updated:</strong> February 21, 2025 for OJS 3.3 and 3.4</div> <div class="textbox Forthcoming"><p><strong>Important update:</strong> the <a href="https://github.com/ajnyga/forthcoming" data-url="https://github.com/ajnyga/forthcoming">Forthcoming plugin</a> has been updated for OJS 3.3 and 3.4 and is a much simpler solution than the instructions provided below. These instructions are retained for reference.</p> <p>Please contact the Digital Publishing Librarian to have the plugin installed and configured.</p> </div> <p>OJS does not have a dedicated mechanism for publishing “online first”/”forthcoming” articles but it’s possible to cheat the issue publication process to mimic the feature. The following steps explain how to publish <span class="glossary-term">submissions</span> under the label “Online First” in advance of a regular, numbered <span class="glossary-term">issue</span>.</p> <p>Here’s what you get by following this process:</p> <ul><li>New submissions published as soon as they are ready</li> <li>Stable links and DOIs (if applicable) for the submissions</li> <li>Links to Online First through the navigation menu, the Archive, and through a custom sidebar block (optional)</li> <li>Your most recent, regular issue appears as your <span class="glossary-term">Current Issue</span><span class="footnote"><span class="footnote-indirect" data-fnref="64-1"></span></span><code>.</code></li> </ul> <p>There are three components to this process:</p> <ol><li><a href="#Initial setup of Online First" data-url="https://pressbooks.library.yorku.ca/ojsforydj/chapter/publishing-articles-in-advance-of-full-issue-publication/#Initial setup of Online First">Initial setup of Online First</a></li> <li><a href="#Publishing submissions to online first" data-url="https://pressbooks.library.yorku.ca/ojsforydj/chapter/publishing-articles-in-advance-of-full-issue-publication/#Publishing submissions to online first">Publishing submissions to Online First</a></li> <li><a href="#Reassigning submissions to a regular issue" data-url="https://pressbooks.library.yorku.ca/ojsforydj/chapter/publishing-articles-in-advance-of-full-issue-publication/#Reassigning submissions to a regular issue">Reassigning submissions to a regular issue</a><a href="#Reordering issues in archives" data-url="https://pressbooks.library.yorku.ca/ojsforydj/chapter/publishing-articles-in-advance-of-full-issue-publication/#Reordering issues in archives"></a></li> </ol> <h2><a data-url=""></a>Initial setup of Online First</h2> <p>Follow these steps just once, when you commit to using an online first publication model.</p> <p>You must create and publish your Online First issue, and create a Navigation Menu Item linked to that issue. You can also create a custom sidebar block linked to Online First as well.</p> <ol><li>Create your Online First issue: <ol style="list-style-type: lower-roman"><li>Follow the <a href="#chapter-creating-an-issue" data-url="https://pressbooks.library.yorku.ca/ojsforydj/chapter/creating-an-issue/">steps for creating an issue</a></li> <li>In Step 2 of Creating an Issue, use the title “Online First” and select only the <strong>Title</strong> checkbox.</li> </ol> </li> <li><a href="#chapter-publishing-an-issue" data-url="https://pressbooks.library.yorku.ca/ojsforydj/chapter/publishing-an-issue/">Publish</a> the Online First issue.</li> <li>Change your <span class="glossary-term">Current Issue</span> back to your most recent, regular issue<span class="footnote"><span class="footnote-indirect" data-fnref="64-2"></span></span>: <ol style="list-style-type: lower-roman"><li>Go to <strong>Issues</strong> &gt; <strong>Back Issues</strong></li> <li>Click the blue arrow beside the title of your most recent, regular issue</li> <li>Click <strong>Current Issue</strong></li> <li>Click <strong>OK</strong>.</li> </ol> </li> <li>Create the Navigation Menu Item: <ol style="list-style-type: lower-roman"><li>Go to <strong>Website Settings</strong> &gt; <strong>Setup</strong> &gt; <strong>Navigation</strong></li> <li>Next to Navigation Menu Items, click <strong>Add Item</strong></li> <li>In the <strong>Title </strong>field, write “Online First”</li> <li>Under <strong>Navigation Menu Type</strong>, select <strong>Remote URL</strong></li> <li>In the <strong>URL</strong> field that just appeared, paste the full URL of your Online First issue<br /> <strong>Note for multilingual journals:</strong> you must paste the same URL in the field for each language activated for your journal.</li> <li>Click <strong>Save</strong>.</li> </ol> </li> <li>Add the Navigation Menu Item to the Primary Navigation Menu: <ol style="list-style-type: lower-roman"><li>Under Navigation, click <strong>Primary Navigation Menu</strong></li> <li>Drag Online First from the <strong>Unassigned Menu Items</strong> column to the <strong>Assigned Menu Items</strong> column</li> <li>Ensure that the container box for Online First is flush against the left-hand side of the Assigned Menu Items column; if it is indented, it will be nested under the menu item above it</li> <li>Click <strong>Save</strong>.</li> </ol> </li> <li>Optional: create a custom sidebar block: <ol style="list-style-type: lower-roman"><li>Follow the steps for <a href="#chapter-adding-custom-blocks-right-sidebar" data-url="https://pressbooks.library.yorku.ca/ojsforydj/chapter/adding-custom-blocks-right-sidebar/">creating a custom block</a> with the title “Online First”</li> <li>In the <strong>Content</strong> field, write “Online First”</li> <li>Link the text in the Content field to your Online First issue</li> <li>Keep the box under <strong>Show Name</strong> unchecked.</li> </ol> </li> </ol> <p>Online First is now a published issue without any submissions that appears in the navigation menu, in the Archives and, optionally, in a custom block in the right sidebar. You can now publish submissions to this issue as they are ready.</p> <h2><a data-url=""></a>Publishing submissions to Online First</h2> <p>Follow these steps every time you wish to publish a new submission to Online First.</p> <p>When you have completed the editorial and production workflow for the submission, you can assign it the Online First issue to have it published immediately.</p> <ol><li>If your journal’s submissions receive DOIs, manually <a href="#Assign DOI manually" data-url="https://pressbooks.library.yorku.ca/ojsforydj/chapter/adding-dois-rolling-publication#Assign DOI manually">assign the DOI</a> to the submission</li> <li>Go to <strong>Production</strong> &gt; <strong>Issue</strong> for the submission</li> <li>Under the Issue heading, click <strong>Assign to Issue</strong></li> <li>Select Online First from the drop-down menu</li> <li>Click <strong>Save</strong></li> <li>A notification saying “All publication requirements have been met” will appear. Click <strong>Publish.</strong></li> <li>If your journal’s submissions receive DOIs, manually <a href="#Register DOI manually" data-url="https://pressbooks.library.yorku.ca/ojsforydj/chapter/adding-dois-rolling-publication#Register DOI manually">register the DOI</a>.</li> </ol> <p>The submission will now be published in Online First. If the submission has a DOI, the DOI will now be registered and functional.</p> <p>You cannot use OJS’s built-in notification to notify your readers about newly published submissions – it only sends notifications for new issues. You may wish to use the Announcements plugin in order to send notifications about newly published submissions.</p> <h2><a data-url=""></a>Reassigning submissions to a regular issue</h2> <p>Follow these steps when you are ready to publish a complete, regular issue.</p> <p>You must reassign the articles from Online First to the new issue, publish the new issue, and then reorder your list of issues.</p> <ol><li><a href="#chapter-creating-an-issue" data-url="https://pressbooks.library.yorku.ca/ojsforydj/chapter/creating-an-issue/">Create a new, regular issue.</a></li> <li>Unpublish the submissions from Online First: <ol style="list-style-type: lower-roman"><li>Go to <strong>Issues</strong> &gt; <strong>Back Issues</strong></li> <li>Click Online First</li> <li>In the Table of Contents, click the blue arrow next to the title of the submission your wish to reassign and then click <strong>Remove</strong></li> <li>Repeat step 2.iii for all submissions you wish to reassign to the new, regular issue.</li> </ol> </li> <li>Reassign the submissions to the new issue: <ol style="list-style-type: lower-roman"><li>Find the submission(s) you wish to reassign in <strong>Submissions</strong> &gt; <strong>My Queue</strong> or <strong>Submissions</strong> &gt; <strong>All Active</strong></li> <li>For each submission, go to <strong>Production</strong> &gt; <strong>Issue</strong></li> <li>Under the Issue heading, click <strong>Change Issue</strong></li> <li>Select the new issue from the drop-down menu</li> <li>Click <strong>Save</strong></li> <li>A notification saying “All publication requirements have been met” will appear; however, the submission will not be republished until you publish the new issue. Click <strong>Publish.</strong></li> <li>If you are updating the galley to include volume, issue, and page number, you may now do so in the <strong>Galleys</strong> tab. Under the galley file name, click <strong>Change File</strong> and follow the process to replace the file.</li> <li>Repeat steps 3.i-3.vii for all submissions you wish to reassign to the new, regular issue.</li> </ol> </li> <li><a href="#chapter-publishing-an-issue" data-url="https://pressbooks.library.yorku.ca/ojsforydj/chapter/publishing-an-issue/">Publish the new issue</a>.</li> <li>Reorder your list of issues<span class="footnote"><span class="footnote-indirect" data-fnref="64-3"></span></span>: <ol style="list-style-type: lower-roman"><li>Go to <strong>Issues</strong> &gt; <strong>Back Issues</strong></li> <li>Click <strong>Order</strong></li> <li>Drag Online First to the top of the list of issues</li> <li>Click <strong>Done</strong>.</li> </ol> </li> </ol> <p>The submissions that were previously published in Online First will now appear in OJS as part of the new issue. However, the URLs and DOIs for the published submissions will remain unchanged.</p> 
	</div>
			
				
				<div class="footnotes"><div id='64-1'><p>You cannot show the contents of both your Online First issue and your most recent, regular issue on your journal&#8217;s homepage. OJS only displays the contents of the Current Issue on your journal&#8217;s homepage, and only one issue can be designated at the Current Issue. You must therefore designate either Online First or your most recent, regular issue as your Current Issue; YDJ advises designated the regular issue as the Current Issue. While it may be <em>technically</em> possible to display more than one table of contents but YDJ does not have the resources to customize OJS like this or to support the customization.</p>
</div><div id='64-2'><p>If you skip this step, the empty Online First issue will appear on your OJS homepage. This may create the impression that your journal is inactive or that there is a problem with the website.</p>
</div><div id='64-3'><p>By default, each newly published issue appears at the top of the list of issues in the Archive. This step ensures that Online First remains that the top of the list in the Archive.</p>
</div></div>
	</div>
<div class="chapter standard with-subsections" id="chapter-continuous-publication-in-a-regular-issue-rolling-publication" title="Continuous publication in a regular issue: &quot;rolling publication&quot;">
	<div class="chapter-title-wrap">
		<p class="chapter-number">29</p>
		<h1 class="chapter-title">Continuous publication in a regular issue: &quot;rolling publication&quot;</h1>
								</div>
	<div class="ugc chapter-ugc">
				 <div class="textbox shaded"><strong>Last updated: </strong>November 18, 2021 for OJS 3.3.0.8</div> <p>OJS allows you to assign a submission to an issue that has already been published. Doing so immediately publishes the submission. Therefore, implementing a rolling publication model is simple in OJS.</p> <p>To implement a rolling publication model:</p> <ol><li>Determine your publication cycle (e.g., annual).</li> <li>At the beginning of the publication cycle, <a href="#chapter-creating-an-issue" data-url="https://pressbooks.library.yorku.ca/ojsforydj/chapter/creating-an-issue/">create a new issue</a>.</li> <li><a href="#chapter-publishing-an-issue" data-url="https://pressbooks.library.yorku.ca/ojsforydj/chapter/publishing-an-issue/">Publish the issue</a><span class="footnote"><span class="footnote-indirect" data-fnref="218-1"></span></span>.</li> <li>When you have completed the editorial and production workflow for a submission, publish it be assigning it to the current issue in <strong>Publication</strong> &gt; <strong>Issue</strong>. The submission will now appear be live on the OJS site.</li> <li>Repeat step 4 until the end of the publication cycle.</li> <li>At the end of the publication cycle, return to step 2.</li> </ol> <p>If your journal provides submissions with DOIs, you must <a href="#chapter-adding-dois-rolling-publication" data-url="https://pressbooks.library.yorku.ca/ojsforydj/chapter/adding-dois-rolling-publication/">manually assign and register the DOI</a> for each new submissions you publish<span class="footnote"><span class="footnote-indirect" data-fnref="218-2"></span></span>.</p> <p>If you use the rolling publication model, you cannot use OJS’s built-in notification to notify your readers about newly published submissions – it only sends notifications for new issues. You may wish to use the Announcements plugin in order to send notifications about newly published submissions.</p> 
	</div>
			
				
				<div class="footnotes"><div id='218-1'><p>You may wish to delay publication of the new issue until you have a submission ready to publish in the new publication cycle. This will prevent OJS from displaying an empty table of contents on your journal&#8217;s homepage.</p>
</div><div id='218-2'><p>Unless you have assigned a submission when you first publish the issue (see footnote 1). In this case, OJS will automatically assign and register the DOI.</p>
</div></div>
	</div>
<div class="chapter standard with-subsections" id="chapter-adding-dois-rolling-publication" title="Adding DOIs for online first or rolling publication models">
	<div class="chapter-title-wrap">
		<p class="chapter-number">30</p>
		<h1 class="chapter-title">Adding DOIs for online first or rolling publication models</h1>
								</div>
	<div class="ugc chapter-ugc">
				 <div class="textbox shaded"><strong>Last updated:</strong> November 12, 2021 for OJS 3.3.0.8</div> <p>If you publish a <span class="glossary-term">submission</span> after the publication of the <span class="glossary-term">issue</span> – for example, if you have a rolling publication schedule – the DOIs will not be automatically assigned and registered. You must perform two small tasks to do this manually.</p> <h2><a data-url=""></a>Assign the DOI prior to publishing the submission:</h2> <ol><li>Open the submission’s <strong>Publication</strong> tab</li> <li>Go to the <strong>Identifiers</strong> facet</li> <li>Click <strong>Assign</strong>, next to the DOI field</li> <li>Click <strong>Save</strong>.</li> </ol> <p><strong>Note:</strong> if you forget to assign the DOI prior to publication, you can perform these steps by <a href="#chapter-editing-after-publication" data-url="https://pressbooks.library.yorku.ca/ojsforydj/chapter/editing-after-publication/">editing the submission after publication</a>.</p> <h2><a data-url=""></a>Register the DOI with CrossRef:</h2> <ol><li>In the back end of OJS, click <strong>Tools</strong> in the left-hand menu</li> <li>Open the <strong>CrossRef XML</strong> Export Plugin in the list of Tools</li> <li>Click the <strong>Articles</strong> tab. Your newly published submission should appear at the top of the list with the status Not Deposited</li> <li>Click the checkbox for the submission</li> <li>Scroll to the bottom of the page and click <strong>Deposit</strong></li> <li>Wait for the page to reload. If registration is successful, you have completed the process. If you get an error message, please notify the Digital Publishing Librarian.</li> </ol> <p><strong>Note:</strong> this must be performed by a user with the Journal Editor or Journal Manager role</p> 
	</div>


	</div>
<div class="chapter standard with-subsections" id="chapter-bypassing-the-editorial-workflow-in-ojs" title="Bypassing the editorial workflow in OJS">
	<div class="chapter-title-wrap">
		<p class="chapter-number">31</p>
		<h1 class="chapter-title">Bypassing the editorial workflow in OJS</h1>
								</div>
	<div class="ugc chapter-ugc">
				 <div class="textbox shaded"><p><strong>Last updated:</strong> July 28, 2025 for OJS 3.3 and 3.4</p> </div> <p>This page is intended for journal editors who perform the editorial workflow (submission, review, copyediting, or layout production) outside OJS and only wish to use OJS to host the finished materials.</p> <p>The individual steps of this process are covered elsewhere in this guide but linked here:</p> <ol><li><a href="#chapter-creating-an-issue" data-url="https://pressbooks.library.yorku.ca/ojsforydj/chapter/creating-an-issue/">Create a new issue</a>: before uploading the journal contents, you want to create the future issue in which they will be published. This is because the QuickSubmit plugin (step 2) allows you to assign the contents directly to an issue.</li> <li><a href="#chapter-using-the-quicksubmit-plugin" data-url="https://pressbooks.library.yorku.ca/ojsforydj/chapter/using-the-quicksubmit-plugin/">Upload the contents using QuickSubmit</a>: use the QuickSubmit plugin to upload each new submission (article, editorial, review, etc.) to OJS. Do&nbsp;<em>not</em> use this to upload a single, full-issue galley. <ol style="list-style-type: lower-alpha"><li>In step 7, you will want to select <strong>Published</strong> in order to assign the content to the new, unpublished issue you created previously.</li> </ol> </li> <li><a href="#chapter-dois-and-quicksubmit" data-url="https://pressbooks.library.yorku.ca/ojsforydj/chapter/dois-and-quicksubmit/">Assign the DOIs to the articles</a>: do this after you have uploaded all the contents.</li> <li><a href="#chapter-issue-galley" data-url="https://pressbooks.library.yorku.ca/ojsforydj/chapter/issue-galley/">Upload the full-issue galley (optional)</a>: if you have a single galley file containing all the issue contents, upload it here.</li> <li><a href="#chapter-publishing-an-issue" data-url="https://pressbooks.library.yorku.ca/ojsforydj/chapter/publishing-an-issue/">Publish the issue</a>: once you have added all contents to the new issue, you can publish the issue.</li> </ol> 
	</div>


	</div>
<div class="chapter standard with-subsections" id="chapter-publishing-audio-or-video-journal-content" title="Publishing audio or video journal content">
	<div class="chapter-title-wrap">
		<p class="chapter-number">32</p>
		<h1 class="chapter-title">Publishing audio or video journal content</h1>
								</div>
	<div class="ugc chapter-ugc">
				 <div class="textbox shaded"><p><strong>Last updated:</strong> March 31, 2026 for OJS 3.3.0-22</p> </div> <p>YDJ allows you to publish audio or video media content in a journal issue by embedding it in an HTML galley.</p> <p>There are three parts to this:</p> <ul><li>Submission and review</li> <li>Hosting the media files, and</li> <li>Embedding the stream in a galley.</li> </ul> <h2>Submission and review</h2> <p>OJS is not well-equipped to accept large media files as submissions files. Therefore, if your journal accepts multimedia submissions, YDJ recommends creators share their media files with the editors outside of OJS.</p> <h2>Hosting the media files</h2> <p>Media files may be hosted locally through <a href="https://digital.library.yorku.ca/" data-url="https://digital.library.yorku.ca/">York University Digital Library (YUDL)</a> or externally via third-party service. If possible, YDJ prefers to host a copy of the media file in YUDL. This ensures that the media will be preserved in accordance with the YUL’s <a href="https://www.library.yorku.ca/web/about-us/library-policies/digital-preservation-policy/" data-url="https://www.library.yorku.ca/web/about-us/library-policies/digital-preservation-policy/">Digital Preservation Policy</a> and that the link will remain stable.</p> <p>Content creators/owners must agree to the York University Digital Library Distribution Licence (available upon request) to have their material preserved in YUDL. If they do not agree to the terms, the media files must be hosted elsewhere.</p> <h3>Hosting through York University Digital Library</h3> <p>If hosting with YUDL, the editor must return the YUDL Distribution Licence and the following information to YDJ:</p> <ul><li>Copyright holder</li> <li>Rights statement, such as a <a href="https://creativecommons.org/share-your-work/cclicenses/" data-url="https://creativecommons.org/share-your-work/cclicenses/">Creative Commons license</a>, <a href="https://rightsstatements.org/en/" data-url="https://rightsstatements.org/en/">RightsStatement.org statement</a>, or <a href="https://localcontexts.org/labels/traditional-knowledge-labels/" data-url="https://localcontexts.org/labels/traditional-knowledge-labels/">Traditional Knowledge label</a></li> </ul> <p>The Digital Publishing Librarian will direct you on the best method for sharing the media file.</p> <h3>External hosting</h3> <p>It is also possible to link to an external host (such as YouTube, Vimeo, or Soundcloud). Externally hosted media is subject to the provider’s terms of use. External hosts may not provide media files with a stable URL or preserve them indefinitely; therefore, it is possible that the media stream in OJS breaks. It is the journal’s responsibility to monitor the media stream and to have the galley updated, if required.</p> <h2>Embedding the stream in a galley</h2> <p>However you choose to host the media files, please provide the following metadata to the Digital Publishing Librarian:</p> <ul><li>Title</li> <li>Author/creator(s)</li> <li>Text description</li> </ul> <p>YDJ will embed the stream to the media file in an HTML galley. YDJ will create the media galley and share it with the editor for uploading.</p> <p>The galley will include:</p> <ul><li>The title of the work</li> <li>The creator(s) of the work</li> <li>A text description of the work.</li> <li>Publication and issue information.</li> </ul> <p>The media is embedded in such a way that, if it fails to render properly, it will be replaced by a link to the original media file.</p> 
	</div>


	</div>

</div>
<div class="part-wrapper" id="part-accessibility-wrapper">
    <div class="part  " id="part-accessibility">
	<div class="part-title-wrap">
		<p class="part-number">VI</p>
		<h1 class="part-title">Accessibility</h1>
	</div>
	<div class="ugc part-ugc">
		<div class="textbox shaded"><strong>Last updated:</strong> September 24, 2021.</div> <p>As of January 1, 2021, all <span class="glossary-term">YDJ</span> sites and article galleys published after January 1, 2012 must comply with the <a href="https://www.ontario.ca/laws/statute/05a11" data-url="https://www.ontario.ca/laws/statute/05a11"><em>Accessibility for Ontarians with Disabilities Act</em> (AODA)</a>.</p> <p>AODA requirements for websites are based on the <a href="https://www.w3.org/WAI/standards-guidelines/wcag/" data-url="https://www.w3.org/WAI/standards-guidelines/wcag/">Web Content Accessibility Guidelines (WCAG)</a> version 2.0, level AA. You can find a quick reference guide called <a href="https://www.w3.org/WAI/WCAG21/quickref/" data-url="https://www.w3.org/WAI/WCAG21/quickref/">How to Meet WCAG</a> online but you may find that this is overly technical and complex for your purposes: WCAG covers content types and technologies not used with OJS, and many WCAG requirements are covered by the OJS platform itself.</p> <p>The best starting point for making accessible, AODA compliant content in OJS is PKP’s <a href="https://docs.pkp.sfu.ca/accessible-content/en/" data-url="https://docs.pkp.sfu.ca/accessible-content/en/">Creating Accessible Content: A Guide for Journal Editors and Authors</a> guide. Although the guide does not cite AODA, it is based on the WCAG standards used by AODA. The guide is most applicable to article galleys, but the same principles apply to content on the OJS site itself.</p> <p>You should also refer to the <a href="https://docs.pkp.sfu.ca/designing-your-journal/en/inclusive-and-accessible-theming" data-url="https://docs.pkp.sfu.ca/designing-your-journal/en/inclusive-and-accessible-theming">Inclusive and Accessible Theming</a> guide to understand how to keep make and keep your OJS pages accessible.</p>
	</div>
			
				
	</div>
<div class="chapter standard with-subsections" id="chapter-adding-title-and-heading-tags-to-a-word-document" title="Adding title and heading tags to a Word document">
	<div class="chapter-title-wrap">
		<p class="chapter-number">33</p>
		<h1 class="chapter-title">Adding title and heading tags to a Word document</h1>
								</div>
	<div class="ugc chapter-ugc">
				 <div class="textbox shaded"><strong>Last updated:</strong> September 24, 2021</div> <p>&nbsp;</p> <p>One of the most important things you can do to make your article galleys accessible is to tag the title and headings in your article galley. This structures your document so that it can be parsed and browsed by readers using assistive technologies such as screen readers.</p> <p>In Word, you add these title and heading tags by using styles. The easiest way to access styles is through the Styles pane in the Home toolbar (Figure 1).</p> <p>&nbsp;</p> <div class="wp-caption aligncenter" id="attachment_89" aria-describedby="caption-attachment-89" style="width: 300px"><a href="https://pressbooks.library.yorku.ca/ojsforydj/wp-content/uploads/sites/94/2021/09/Word-Styles-pane-marked.jpg" data-url="https://pressbooks.library.yorku.ca/ojsforydj/wp-content/uploads/sites/94/2021/09/Word-Styles-pane-marked.jpg"><img src="https://pressbooks.library.yorku.ca/ojsforydj/wp-content/uploads/sites/94/2021/09/Word-Styles-pane-marked-300x195.jpg" alt="The Styles pane in Microsfot Word" class="wp-image-89 size-medium" width="300" height="195" srcset="https://pressbooks.library.yorku.ca/ojsforydj/wp-content/uploads/sites/94/2021/09/Word-Styles-pane-marked-300x195.jpg 300w, https://pressbooks.library.yorku.ca/ojsforydj/wp-content/uploads/sites/94/2021/09/Word-Styles-pane-marked-65x42.jpg 65w, https://pressbooks.library.yorku.ca/ojsforydj/wp-content/uploads/sites/94/2021/09/Word-Styles-pane-marked-225x146.jpg 225w, https://pressbooks.library.yorku.ca/ojsforydj/wp-content/uploads/sites/94/2021/09/Word-Styles-pane-marked-350x228.jpg 350w, https://pressbooks.library.yorku.ca/ojsforydj/wp-content/uploads/sites/94/2021/09/Word-Styles-pane-marked.jpg 659w" sizes="auto, (max-width: 300px) 100vw, 300px" title="" /></a><div class="wp-caption-text" id="caption-attachment-89">Figure 1: the Styles pane in Microsoft Word.</div></div> <p>Styles have two functions:</p> <ol><li>they dictate the design and layout of the text, and</li> <li>they apply semantic tags that structure the document.</li> </ol> <p>The second function is the most important one for accessibility purposes.</p> <p>If you have already chosen the font and paragraph layout for your headings you haven’t applied the styles, you can match the style to your design by following the steps described in <a href="#update-style" data-url="https://pressbooks.library.yorku.ca/ojsforydj/chapter/adding-title-and-heading-tags-to-a-word-document/#update-style">Updating styles to match formatted text</a>, below.</p> <h2><a id="applying-styles" data-url=""></a>Applying styles to text</h2> <p>To apply styles to your text, select the relevant text and then click the appropriate style in the Styles pane. Alternatively, you can click on a style and then start typing: the text you type will use that style.</p> <p>In more recent versions of Word, a button to access styles may appear automatically alongside other formatting options above highlighted text.</p> <p>See also: <a href="https://support.microsoft.com/en-us/office/apply-styles-f8b96097-4d25-4fac-8200-6139c8093109" data-url="https://support.microsoft.com/en-us/office/apply-styles-f8b96097-4d25-4fac-8200-6139c8093109">Apply styles</a> from the Microsoft Word Help &amp; Training site.</p> <h2>Heading structure</h2> <p>Your title and heading styles must be applied in a hierarchical and logical way. The title of the article must use the Title style; first-level headings must use the Heading 1 style; second-level headings must use the Heading 2 style, etc. You must not skip heading levels for the sake of design.</p> <h2><a id="update-style" data-url=""></a>Updating styles to match formatted text</h2> <p>If you have already formatted your text before applying the styles, you can update the appearance of the title and heading styles to match your formatting.</p> <p>To update styles based on your document formatting:</p> <ol><li>Select the text of your title or a heading (number 1 in Figure 2)</li> <li>Right-click the appropriate style in the Styles pane (number 2 in Figure 2)</li> <li>Click “Update [style] to Match Selection” (number 3 in Figure 2)</li> </ol> <div class="wp-caption aligncenter" id="attachment_92" aria-describedby="caption-attachment-92" style="width: 300px"><a href="https://pressbooks.library.yorku.ca/ojsforydj/wp-content/uploads/sites/94/2021/09/word-styles-modify.png" data-url="https://pressbooks.library.yorku.ca/ojsforydj/wp-content/uploads/sites/94/2021/09/word-styles-modify.png"><img src="https://pressbooks.library.yorku.ca/ojsforydj/wp-content/uploads/sites/94/2021/09/word-styles-modify-300x181.png" alt="The styles pane in Word, showing the option to update a style to match text formatting" class="size-medium wp-image-92" width="300" height="181" srcset="https://pressbooks.library.yorku.ca/ojsforydj/wp-content/uploads/sites/94/2021/09/word-styles-modify-300x181.png 300w, https://pressbooks.library.yorku.ca/ojsforydj/wp-content/uploads/sites/94/2021/09/word-styles-modify-768x462.png 768w, https://pressbooks.library.yorku.ca/ojsforydj/wp-content/uploads/sites/94/2021/09/word-styles-modify-65x39.png 65w, https://pressbooks.library.yorku.ca/ojsforydj/wp-content/uploads/sites/94/2021/09/word-styles-modify-225x135.png 225w, https://pressbooks.library.yorku.ca/ojsforydj/wp-content/uploads/sites/94/2021/09/word-styles-modify-350x211.png 350w, https://pressbooks.library.yorku.ca/ojsforydj/wp-content/uploads/sites/94/2021/09/word-styles-modify.png 844w" sizes="auto, (max-width: 300px) 100vw, 300px" title="" /></a><div class="wp-caption-text" id="caption-attachment-92">Figure 2: when you right-click a style in the Style pane, you have the option to update the style to match selected text.</div></div> <p>Once you have updated your styles, you can then select all of the title and heading text in your document and apply the styles where required (see <a href="#applying-styles" data-url="https://pressbooks.library.yorku.ca/ojsforydj/chapter/adding-title-and-heading-tags-to-a-word-document/#applying-styles">Applying styles to text</a>, above).</p> <p>See also: <a href="https://support.microsoft.com/en-us/office/customize-or-create-new-styles-d38d6e47-f6fc-48eb-a607-1eb120dec563" data-url="https://support.microsoft.com/en-us/office/customize-or-create-new-styles-d38d6e47-f6fc-48eb-a607-1eb120dec563">Customize or create new styles</a> from the Microsoft Office Support site.</p> 
	</div>


	</div>

</div>
<div class="part-wrapper" id="part-metrics-wrapper">
    <div class="part  " id="part-metrics">
	<div class="part-title-wrap">
		<p class="part-number">VII</p>
		<h1 class="part-title">Metrics</h1>
	</div>
	<div class="ugc part-ugc">
		<p>This section discusses the various metrics available to you as a YDJ journal.</p>
	</div>
			
				
	</div>
<div class="chapter standard with-subsections" id="chapter-altmetric-explorer" title="Altmetric Explorer">
	<div class="chapter-title-wrap">
		<p class="chapter-number">34</p>
		<h1 class="chapter-title">Altmetric Explorer</h1>
								</div>
	<div class="ugc chapter-ugc">
				 <div class="textbox shaded"><strong>Last updated:</strong> March 3, 2022 for OJS 3.3.0.8</div> <p>YDJ journals have access to altmetric data through <a href="https://www.library.yorku.ca/web/research-metrics/altmetric-explorer/" data-url="https://www.library.yorku.ca/web/research-metrics/altmetric-explorer/">YUL’s subscription to Altmetric Explorer</a>. York-affiliated editors can access <a href="https://www.altmetric.com/explorer/login" data-url="https://www.altmetric.com/explorer/login">Altmetric Explorer directly</a>. Editors without a York University affiliation can request reports for their journal from the <a href="mailto:tmrozews@yorku.ca" data-url="mailto:tmrozews@yorku.ca">Digital Publishing Librarian</a>.</p> <p>In order to get altmetric data for your journal in Altmetric Explorer, your journal must:</p> <ol><li>Receive <a href="#part-dois" data-url="https://pressbooks.library.yorku.ca/ojsforydj/part/dois/">DOIs</a>, and</li> <li>Be tracked by Altmetric.</li> </ol> <p>The Digital Publishing Librarian can make sure that your journal is tracked by Altmetric.</p> <p>At present, there is no functional integration of Altmetric Explorer and OJS. This means that it isn’t possible to display data from Altmetric on your journal’s OJS site.</p> 
	</div>


	</div>
<div class="chapter standard with-subsections" id="chapter-plum-metrics" title="Plum metrics">
	<div class="chapter-title-wrap">
		<p class="chapter-number">35</p>
		<h1 class="chapter-title">Plum metrics</h1>
								</div>
	<div class="ugc chapter-ugc">
				 
	</div>


	</div>
<div class="chapter standard with-subsections" id="chapter-crossref-cited-by" title="Crossref Cited-by">
	<div class="chapter-title-wrap">
		<p class="chapter-number">36</p>
		<h1 class="chapter-title">Crossref Cited-by</h1>
								</div>
	<div class="ugc chapter-ugc">
				 
	</div>


	</div>

</div>
<div class="part-wrapper" id="part-slug-69e2a724249d4-wrapper">
    <div class="part  " id="part-slug-69e2a724249d4">
	<div class="part-title-wrap">
		<p class="part-number">VIII</p>
		<h1 class="part-title">ORCID iD</h1>
	</div>
	<div class="ugc part-ugc">
		<p>Last updated: August 15, 2022 for OJS 3.3.0.11</p> <p>YDJ</p>
	</div>
			
				
	</div>

</div>
<div class="part-wrapper" id="part-article-layout-and-design-wrapper">
    <div class="part  " id="part-article-layout-and-design">
	<div class="part-title-wrap">
		<p class="part-number">VIII</p>
		<h1 class="part-title">Article layout and design</h1>
	</div>
	<div class="ugc part-ugc">
		
	</div>
			
				
	</div>
<div class="chapter standard with-subsections" id="chapter-creating-article-templates-in-word" title="Creating article templates in Word">
	<div class="chapter-title-wrap">
		<p class="chapter-number">37</p>
		<h1 class="chapter-title">Creating article templates in Word</h1>
								</div>
	<div class="ugc chapter-ugc">
				 <div class="textbox shaded"><p><strong>Last updated:</strong> August 20, 2025</p> </div> <p>Although doing article design and layout in Microsoft Word may not seem like a professional approach, there are significant advantages to using it:</p> <ul><li><strong>Design features:</strong> Word features Themes that configure design elements such as font family, colours, and styles so that the articles won’t look like default Word output. You can also customize and create new Themes for your journal. Learn more about <a href="https://support.microsoft.com/en-us/office/design-and-edit-in-word-bc819ecd-9887-4a15-8eda-d90cbc58f8fb" data-url="https://support.microsoft.com/en-us/office/design-and-edit-in-word-bc819ecd-9887-4a15-8eda-d90cbc58f8fb">Styles and Themes</a> and about <a href="https://support.microsoft.com/en-us/office/change-a-theme-and-make-it-the-default-in-word-or-excel-c846f997-968e-4daa-b2d4-42bd2afef904" data-url="https://support.microsoft.com/en-us/office/change-a-theme-and-make-it-the-default-in-word-or-excel-c846f997-968e-4daa-b2d4-42bd2afef904">customizing Themes</a> in Word.</li> <li><strong>Templates:</strong> You can create article templates in Word that you can apply to your submissions and that you can share with your fellow editors. Templates include Theme and Style information, and allow you to lay out standard elements such as journal information, article metadata, and copyright/licensing info. Learn more about <a href="https://support.microsoft.com/en-us/office/create-a-template-86a1d089-5ae2-4d53-9042-1191bce57deb" data-url="https://support.microsoft.com/en-us/office/create-a-template-86a1d089-5ae2-4d53-9042-1191bce57deb">working with templates</a> in Word.</li> <li><strong>Accessibility:</strong> Word includes many features to help you make documents accessible. Tools include <a href="https://support.microsoft.com/en-us/office/make-your-word-documents-accessible-to-people-with-disabilities-d9bf3683-87ac-47ea-b91a-78dcacb3c66d#bkmk_builtinheadings_win" data-url="https://support.microsoft.com/en-us/office/make-your-word-documents-accessible-to-people-with-disabilities-d9bf3683-87ac-47ea-b91a-78dcacb3c66d#bkmk_builtinheadings_win">title, sub-title, and heading styles</a>, easily editable <a href="https://support.microsoft.com/en-us/office/make-your-word-documents-accessible-to-people-with-disabilities-d9bf3683-87ac-47ea-b91a-78dcacb3c66d#bkmk_altvisuals_win" data-url="https://support.microsoft.com/en-us/office/make-your-word-documents-accessible-to-people-with-disabilities-d9bf3683-87ac-47ea-b91a-78dcacb3c66d#bkmk_altvisuals_win">alt-text for images figures</a>, and an <a href="https://support.microsoft.com/en-us/office/improve-accessibility-with-the-accessibility-checker-a16f6de0-2f39-4a2b-8bd8-5ad801426c7f#PickTab=Windows&amp;picktab=windows" data-url="https://support.microsoft.com/en-us/office/improve-accessibility-with-the-accessibility-checker-a16f6de0-2f39-4a2b-8bd8-5ad801426c7f#PickTab=Windows&amp;picktab=windows">Accessibility Checker</a>. You can preserve many of these accessibility features in your galley PDF by using the option to save a file as a PDF (<em>not</em> printing as PDF). Learn more about <a href="https://support.microsoft.com/en-us/office/make-your-word-documents-accessible-to-people-with-disabilities-d9bf3683-87ac-47ea-b91a-78dcacb3c66d" data-url="https://support.microsoft.com/en-us/office/make-your-word-documents-accessible-to-people-with-disabilities-d9bf3683-87ac-47ea-b91a-78dcacb3c66d">creating accessible documents in Word</a> more generally, and see also PKP’s guide on <a href="https://docs.pkp.sfu.ca/accessible-content/en/" data-url="https://docs.pkp.sfu.ca/accessible-content/en/">creating accessible journal content</a>.</li> <li><strong>Sustainability: Word</strong> is widely used and most editors already have some experience with it. The learning curve for features such as Styles, Designs, and Templates will be move quicker than for more specialized software. Because it is so widely used, you can easily search the web for help and ideas. In addition, many universities provide students and faculty with free or discounted access to the Word. Other software such as InDesign is difficult to learn, requires significant work to make its outputs accessible, and may be prohibitively expensive.</li> </ul> 
	</div>


	</div>

</div>
<div class="back-matter glossary " id="back-matter-slug-141" title="Glossary">
	<div class="back-matter-title-wrap">
		<p class="back-matter-number">1</p>
		<h1 class="back-matter-title">Glossary</h1>
								</div>
	<div class="ugc back-matter-ugc">
				 <dl data-type="glossary"><dt data-type="glossterm"><dfn id="dfn-current-issue">Current Issue</dfn></dt> <dd data-type="glossdef"><p>The Current Issue is the issue that appears on the front page of your OJS site. When a new issue is published, it is automatically set as Current Issue. However, you can manually set the Current Issue through the Back Issues page in the back end.</p> </dd> <dt data-type="glossterm"><dfn id="dfn-galley">galley</dfn></dt> <dd data-type="glossdef"><p>The galley is the final form of the article - editing, copy edited, and laid out - that is posted to the OJS site for reading.</p> </dd> <dt data-type="glossterm"><dfn id="dfn-issue">issue</dfn></dt> <dd data-type="glossdef"><p>Along with submissions, one of the building blocks of OJS. All submissions (articles, reviews, editorials, etc.) must be assigned to an issue in order to be published.</p> </dd> <dt data-type="glossterm"><dfn id="dfn-ojs">OJS</dfn></dt> <dd data-type="glossdef"><p>Open Journal System - the journal publishing software developed by PKP and used by York University Libraries to host journals.</p> </dd> <dt data-type="glossterm"><dfn id="dfn-quicksubmit">QuickSubmit</dfn></dt> <dd data-type="glossdef"><p>QuickSubmit is a tool for uploading submissions that bypasses all stages of the workflow</p> </dd> <dt data-type="glossterm"><dfn id="dfn-submission">submission</dfn></dt> <dd data-type="glossdef"><p>Along with issues, submissions are a key element in OJS. "Submission" is a generic term that includes articles, book reviews, and art. In the back end, a submission has a Workflow and a Production tab. Once published, a submission has its own web page with metadata and one or more galleys.</p> </dd> <dt data-type="glossterm"><dfn id="dfn-ydj">YDJ</dfn></dt> <dd data-type="glossdef"><p>York Digital Journals - the York University Libraries program that provides journal hosting services.</p> </dd> </dl> 
	</div>


	</div>

</body>
</html>